Friday, March 30, 2012

Spectrum Noir Background Technique


Today I'm sharing a background technique using Spectrum Noir Markers.   I'm having such a good time with mine!! For this technique, you'll need glossy paper, alcohol, a plastic pallet, and a cotton ball.

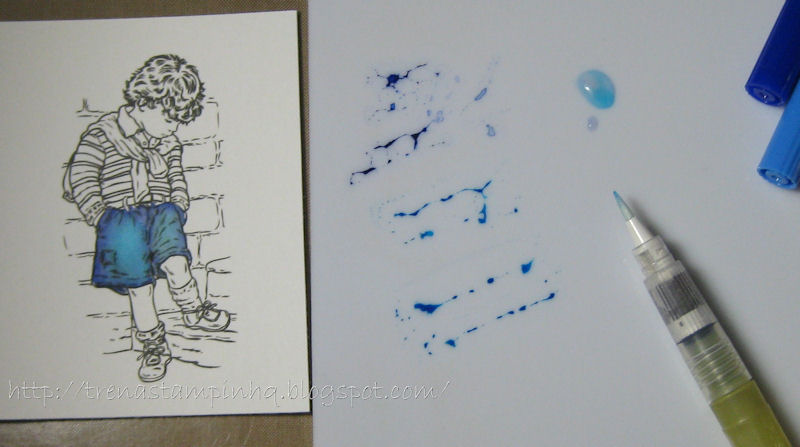
Scribble the markers of your choice on the plastic palette. I used CG1, CT3, PL2 and LV2.

Next, spritz alcohol on the palette, the glossy cardstock and your cotton ball.


Dab your cotton ball into the colors and then dab onto the glossy cardstock. Repeat until you get the results you want.  I had to wipe off my plastic and scribble two more times to get this results.


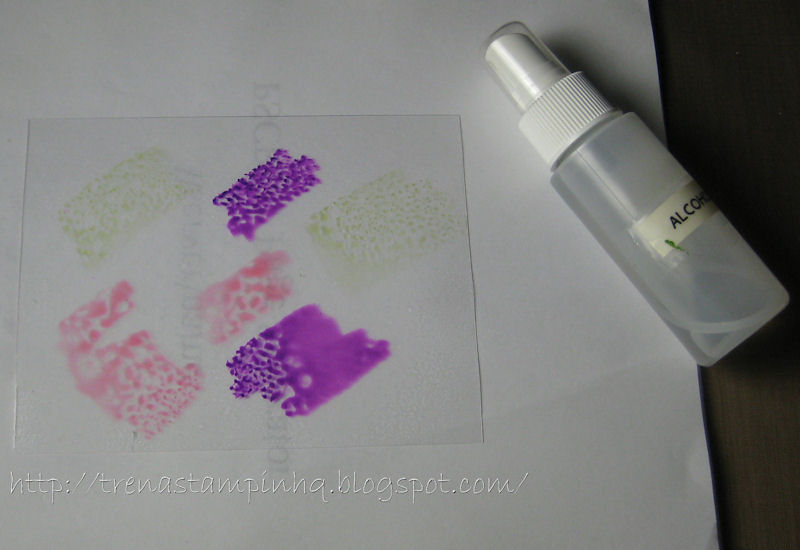
I was on a roll and tried a couple more color combinations: CG2, DG2, JG6 and CR10, PL4, TB6.  There are many color combinations to try! I stopped there though, so I could finish my project. :o)


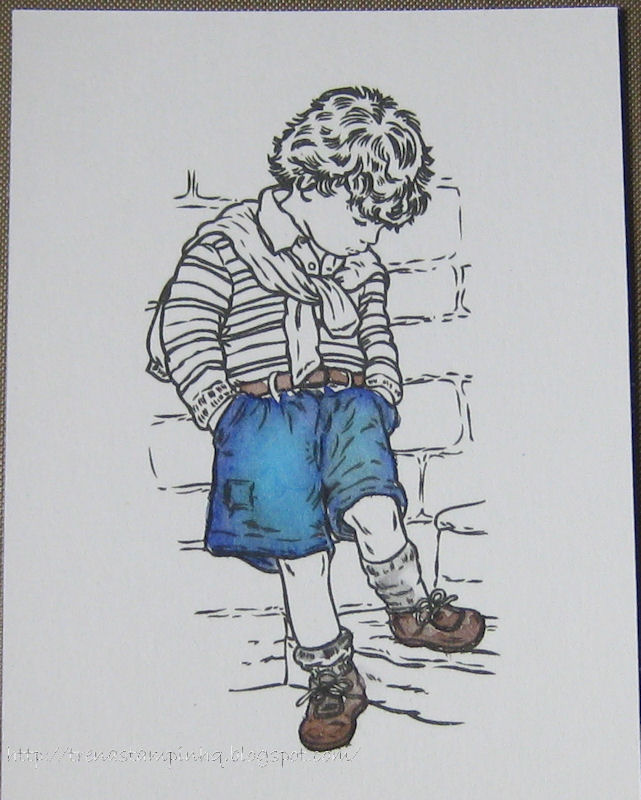
 To color this cute little bunny, I started with Ultra Smooth Premium White Cardstock for Alcohol Markers. Memento ink what I recommend with alcohol ink markers. You'll want to make sure the ink is completely dry.  I added some blades of grass and colored in around his feet.  I used papers and cards stock from Pearlescent Paper & Card Pack - Brights to complete the card.


Here are the markers I used for this project:


I had the perfect image for the green background. :o)  I chose this lovely Elm Tree from Art-Kure. I used another color in the Pearlescent Paper & Card Pack - Brights to complete the card.


Thank you for stopping by!! Please come back to get more ideas and inspiration!!


Take care and STAY POSITIVE!
Trena

Tuesday, March 27, 2012

Welcome to Your New Home!


The new Beatrix Potter images are so adorable and the perfect size when you need a quick card! I shared this card at the Crafter's Companion Information Blog today. Please visit there for lots of ideas and creativity!

This week, I am sharing a card with regular coloring. :o) I needed a quick card over the weekend. My life has been crazy, I needed a card and I REFUSE to buy one, so I just had to make one. There are so many ways to add color, sometimes it's hard to choose.  One thing is for sure! I am diggin' my Spectrum Noir Markers!  I colored this little scene in no time at all. I started with Ultra Smooth Premium White Cardstock for Alcohol Markers. Memento ink what I recommend with alcohol ink markers. You'll want to make sure the ink is completely dry.  Here are the markers I used:
 

The design paper if from BasicGrey, base card and layer cardstock from Stampin' Up!. I also used Spellbinders Nestabilities to cut around my image.

Take care and STAY POSITIVE!

Trena

Tuesday, March 20, 2012

Sailing with a Spectrum Noir Painting Technique

 
Today, I'm sharing a  painting technique with my Spectrum Noir Markers for a adding soft colors.  If you like water coloring, you'll enjoy this technique! It's water coloring with alcohol. :o)  There are a few differences, which I'll point out.  I picked one of Sheena's new designs - the sailboat from her Destination Set to show you how easy it is.

As with water color markers, you scribble color onto a plastic palette.  The first time I started with a water brush filled with alcohol. I  found I prefer to use a brush and dip into the alcohol - that way I have more control over how much liquid I pick up.  I only needed a small amount of alcohol to spread color.  Because alcohol dries quickly, you'll have less time to work and blend, however it does not take much effort to get nice results. I really dig the results!


I stamped the image onto Ultra Smooth Premium White Cardstock for Alcohol Markers. Memento ink works well with this technique. As with coloring with alcohol ink markers, you'll want to make sure the ink is completely dry.

I started with the sail. I scribbled TB1 and PL2 on the plastic sheet. NOTE: it was clear plastic, so I put some white paper underneath so I could actually see where I scribbled. :o) I wanted to give the white sails just a hint of color. I dipped the brush into alcohol and took a little off with a paper towel. I picked up color and then stroked upward where Sheena's design showed the shadows.


For the land, I used GB8 and DG2. One the of nice benefits of using this technique is you can mix colors on your palette, like water coloring, and achieve a nice blend that gives a natural textured look. As with water coloring, wherever you lay down your brush first will be the strongest color then you move your brush across the paper to spread your color.  For the ocean(TB2) under the boat, I actually "scribbled" the color, leaving some areas without color for highlights.  For the ship, I used DR7 and TN7 and again followed Sheena's design for where the darkest area would be.  With little effort, I added soft colors to complete the scene.   There are endless possibilities of ways to color! :o)

Here are the Spectrum Noir Markers I used:


For more ideas about how to use these fabulous markers, please visit the Crafter's Companion Information blog - new posts every day! Also, visit our Challenge Blog.  There are lots of talented Stampin' Sisters over there whipping up some lovely projects! Hope you can make time to color today!!


Take care and STAY POSITIVE!
Trena


Tuesday, March 13, 2012

Watercoloring with Markers


The new Poppet images are perfect for water coloring!! Hi, Trena here to share a card I made using water based markers for water coloring this adorable little boy. I was inspired by the lovely coloring Dawn did last week !  I used a combination of in indirect and direct methods for adding color.  One of the nice things about these images is that the artist drew in areas to guide you for adding shading.

I stamped the image onto watercolor paper. With watercolor, I recommend StazOn ink.  For the indirect method, I scribbled markers onto a plastic pallet - I used two shades in the larger areas.  I then used a water brush to pick up color and spread onto the image.  Starting with his shorts here.


I skipped his legs and moved to his socks, then his belt, and then his shoes.  When water coloring, you want to allow colors to dry before coloring the next section - otherwise, your colors will all run into each other.   Although, depending on what results are you are looking for, you may want that in some areas. :o) As I colored, I left some areas very light, or with no color for highlights.


I continued to fill in color. For very small areas, I used the direct method - coloring directly onto the paper and then spreading color with the water brush.


For the background I used indirect and added a hint of color - I wanted my image to pop out.


TIPS: To give a little extra shadow, use  grey to darken overall tone. If you have any hard lines, re-wet the area with clear water, then add a little of your lightest color for that area. Most important, have fun with it!!

Stamps: Poppets
Paper: Strathmore 140lb cold press watercolor paper, Stampin' Up! basic black card stock, Georgia Pacific white, Basic Grey
Inks: black ink, Tombow Dual Brush Markers
Accessories
: water brush, Sizzix emboss folder

 Take care and STAY POSITIVE!

Tuesday, March 6, 2012

Specturm Noir Background


Today I'm sharing a background technique using Spectrum Noir Markers.

I really dig blended backgrounds with lots of movement.  To get these vibrant colors onto this background, I used a few colors and a swirl/twist motion. What is really nice about this technique, is that you can easily control the amount of color you want.  You can start out with a small amount, see if you like it. If you like it, stop. If you want more,  then do the exact same steps again. You can continue to add color until you get the results you want.

Here's what I did to make this little piece of art:

I first scribbled three markers randomly onto a plastic sheet, spritzed alcohol, then swirled and twisted my cardstock around in the colors.


I wanted more color, so I added some more PP5 and PL5, spritzed,  swirled and twisted again. Well, that just wasn't enough for me! I admit, I'm a bit greedy when it comes to color. :o)  Next I added a darker green, DG4.


After adding the darker green, I was happy with the movement going on.  Whew!


I allowed it to dry completely before going to the next step.  The next step was stamping! I Stamped this new Stamp It - A Map image onto a transparency sheet and trimmed to fit over background.  Memento - rhubarb stalk is a really nice color here. I wanted more of a subtle look over my blended background. I attached the transparency sheet with brads and adhered the background layer onto the base card layer.

Here are all the markers I used  >


Stamps: Stamp It
Paper
: transparency sheet, Stampin' Up! orchid, 
Pearlescent Paper & Card Pack - Brights, Curious Metallic White Gold CardStock
Inks
:
Spectrum Noir Markers, Memento rhubarb stalk
Accessories
: pink brads from my stash


Take care and STAY POSITIVE!

Trena

Sunday, March 4, 2012

One Last Winter Scene!

I made an ATC out of this darling little scene from the Art-Kure line at Crafter's Companion. I used water based markers and a water brush to add color.
  1. Stamped image with permanent ink, such as StazOn, onto watercolor paper.
  2. I then scribbled the markers on my non-stick craft sheet and picked up color with the water brush. I skipped a section as I painted to allow for drying.
  3. For the windows I colored directly onto the paper with the tip of the water based marker.
  4. For the background layer, I scribbled a variety of markers to match my sky on the non-stick craft sheet, spritzed with water and then swirled watercolor paper around.
  5. I used a heat tool for quick drying. You can also let it dry naturally for a little bit different effect.
  6. Cut out and adhered all the layers.
  7. Used glitter glue to add some sparkling snow.
To see more ideas for using these lovely images, visit the Crafter's Companion Information Blog. Every Friday, there is a chance to win stamps. On the Crafter's Companion Challenge blog you can enter one of your lovely designs to win.
Stamps: Art-Kure Gold Hill Shaftsbury
Paper: Fabriano Artistico Extra White Watercolor Paper Block 140lb hot press, Stampin' Up! basic black card stock
Inks: black ink, Tombow Dual Brush Markers
Accessories
: water brush, Stickles star dust glitter glue, Spellbinders Nestabilities die cut

Take care and STAY POSITIVE!
Trena

Friday, March 2, 2012

Watercolor Spruce

A few projects ago, I had so much fun coloring the Spruce Image and Spectrum Noir Markers, I wanted to watercolor the image. I just go back and forth - coloring with markers and water coloring! I admit, I just love coloring!

  1. Just as I did with the Gold Hill Shaftsbury, I stamped image with permanent ink, such as StazOn, onto watercolor paper.
  2. I then scribbled the markers on my non-stick craft sheet and picked up color with the water brush. I skipped a section as I painted to allow for drying.
  3. When it was all dry, I airbrushed the sky. Because the blue marker I used was such light blue and tree is green, I did not mask. I left some white spaces in the sky to create some clouds. I found the Spectrum Noir Markers fit into the Copic Airbrush System and provide a smooth, even results.


Stamps: Art-Kure Spruce Tree
Paper: 140 cold press watercolor paper, green and black card stock
Inks: black ink, Tombow Dual Brush Pens
Accessories: Spellbinders Nestabilities, water brush

Take care and STAY POSITIVE!
Trena

Thursday, March 1, 2012

Winner of $100 Gift Certifiate!!

Thank you to all of you who participated in our efforts to increase the Crafter's Companion Information blog followers!!!

And the winner is.....drum roll......  Kathy Boisvert

Cathie from Cricut Creative Cutter Room sent me! Love your blog.
Kathy Boisvert
Congratulations to Kathy!!

Kathy will receive a  $100 gift certificate to the Crafter's Companion online store.

Take care and STAY POSITIVE!

Trena