Friday, December 27, 2013

Combining Drawing, Painting and Stamping

This design combines drawing, painting and stamping - the flower image is from Sheena's A Little Bit Sketchy EZMount Stamp Set - Flower Power.


 I first painted my background with a paintbrush and acrylic paint onto Ultra Smooth Premium White Cardstock.


Next, I used India ink to draw in the flower pot and horizon line.  After it dried I used a brush to paint the flower pot with gesso and added a deeper shade of purple to the lower section with my finger.


I used a brush to paint the green stripes on the vase and added a tiny touch of gray on the white to get it some shading.


After it dried, I went back in with India ink and went over the the vase outline and horizon. I also added the the steams for the flowers.  I used a little sponge to apply paint to the flower image. I didn't worry to much about cleaning in between colors - I thought it added a little interest.  NOTE: be sure to clean your rubber right away after using paint. I used water. 


I added a deeper blue around the vase. The sentiment is from Sheena's A Little Bit Floral EZMount Stamp Set - Magnolia. I applied black paint with a paper towel and stamped. The flower centers are a little bit of gesso. After the gesso dried, I added dots of black paint and went over the vase and stems one more time with India ink.  I made one flower pop by adding red paint to the flower image and stamping it onto Ultra Smooth Premium White Cardstock. I cut it out and adhered it with Double Sided Adhesive Foam Circles and allowed it hang over the boarder just a little. 


Crafter's Companion has had several new releases. For more ideas, be sure to pop over to the Crafter's Companion Information Blog, as well as visit the Crafter's Companion DT members.  You can see their latest designs by clicking on the names on the left side of my blog.

Shout Out: My design was inspired by a painting that Donna Downey did as part of her 2013 Canvas Create series

Thank you for visiting!!

Take care and STAY POSITIVE!

Tuesday, December 24, 2013

Hanging Around Just Waiting for Santa!

These two are excited about Christmas!


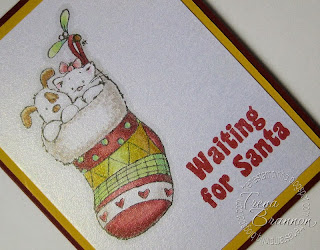
The images are from the Strawberry Kisses Christmas EZMount™ Stamp Set - Waiting for Santa. I stamped the stocking image onto Luxury Centura Pearl Printable Snow White Cardstock and colored them with my Spectrum Noir Markers. Using the packaging as a color guide, I colored directly onto to the cardstock and blended. 


I stamped the sentiment from the set using love letter Memento LUXE ink pad, sprinkled clear embossing powder and heat set.  I traced around the two in the stocking two times with IG1.


On the inside, I stamped a row of stockings using  LUXE ink pad colors pear tart, love letter, and dandelion


Crafter's Companion has had several new releases. For more ideas, be sure to pop over to the Crafter's Companion Information Blog, as well as visit the Crafter's Companion DT members.  You can see their latest designs by clicking on the names on the left side of my blog.

Thank you for visiting!!

Take care and STAY POSITIVE!

Friday, December 20, 2013

Destination on a Gelli Plate Design

Today, I'm featuring the image from Stamp-It Discovery Collection EZMount Stamp - Destination


The background was made with my Gelli Plate and acrylic paint.  The Stamp-It line is so cool for this type technique. I really dig the combination of fine script. the bold image and letters against a colorful background. To see the details of how I made the background, please visit here.  It looked like this to begin with:


I used part of this background on another project and had a piece left - perfect for this size image. I inked up the image, stamped it, sprinkled with embossing powder and heat set.  Next I trimmed it to size. 


To create the lovely embossed butterflies in the background I used the 6" X 6" Embossalicious Embossing Folder - Ornate Butterflies.


On the inside I used a punch to add a few butterflies from the gelli design cardstock.


  Crafter's Companion has had several new releases. For more ideas, be sure to pop over to the Crafter's Companion Information Blog, as well as visit the Crafter's Companion DT members.  You can see their latest designs by clicking on the names on the left side of my blog.

Thank you for visiting!!

Take care and STAY POSITIVE!

Monday, December 16, 2013

Christmas Gift Tags

Do you enjoy making your own gift tags? I do! 


 These little tags feature images from the Crafter's Inspiration Christmas Edition by Crafter's Companion

Crafter's Inspiration Christmas Edition by Crafter's Companion

I used my eBosser to cut several shapes onto Ultra Smooth Premium White Cardstock. I love the ability to run many die cuts through in one pass - saves so much time and effort! 


Next, I stamped images from the Inspiration package. They are so cute- just the right size for tags!


With my Spectrum Noir MarkersI used a combination of direct coloring to the cardstock and also tip to tip coloring. As you lay the color on the cardstock, a natural blending occurs.

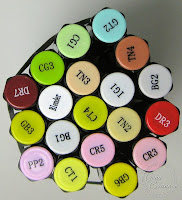
santa: Blender, CR5, DR3, DR7, GB1, IG1, IG7, IG9, IG10, TN1, TN2, TN3, TN4, TN5
kitten: Blender, IG1, BG1, CR5, DR3, DR7, PP4
gingerbread cookie: CR5, DR3, DR7, TN2, TN3, TN4


After coloring I added detail with an artist pen, Stickles, gold metallic and white pens.


For tips and instructions on color with Spectrum Noir Markers, visit the Spectrum Noir Blog, where you'll find lots of information, color combos and inspiration.

Crafter's Companion has had several new releases. For more ideas, be sure to pop over to the Crafter's Companion Information Blog, as well as visit the Crafter's Companion DT members.  You can see their latest designs by clicking on the names on the left side of my blog.

Thank you for visiting!!

Take care and STAY POSITIVE!

Friday, December 13, 2013

Wrapping Paper Background

Have you every received a gift in some beautiful wrapping paper and saved the paper? I do that all the time. Sometimes I use it to wrap a gift or use it as a background for a greeting card.  I received this lovely paper from my work sister. It is so pretty, I knew I had to use it!  And the cool thing is, the other side is also very pretty - I'll use that on a project soon and share! The image is from Sheena A Little Bit Oriental EZMount Stamp Set - Sakura. 


I inked up the lovely flowers image with silver metallic ink, stamp onto Ultra Smooth Premium White Cardstock, sprinkled with silver metallic embossing powder and heat set.   Next I colored with water-based markers. I used the tip to tip method, touching the blender to a light pink to add just a touch of color.


Crafter's Companion has had several new releases. For more ideas, be sure to pop over to the Crafter's Companion Information Blog, as well as visit the Crafter's Companion DT members.  You can see their latest designs by clicking on the names on the left side of my blog.

Thank you for visiting!!

Take care and STAY POSITIVE!

Tuesday, December 10, 2013

CardMaker Magazine Joint Blog Hop

The Crafter's Companion Design Team is celebrating the Holiday Season with CardMaker Magazine.


Two Prize Packs will be given away on the Crafter's Companion USA Facebook page.  Each will include two 6-markers sets - reds and browns - the Christmas Seasons stamp set, a Mistletoe Moments folder and a One year digi subscription to CardMaker  


 I made this lovely Christmas card for the celebration:


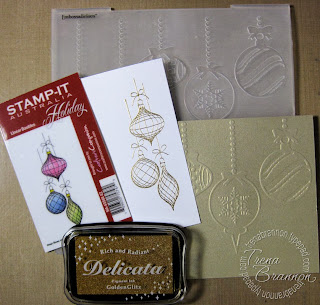
In my project I used images from Stamp-It Holiday Collection EZMount Stamp - Linear Baubles and Sentimentals EZMount Stamp Set - Jingle Bells. I stamped the ornaments onto Ultra Smooth Premium White Cardstock, sprinkled with embossing powder and heat set. For the background I ran the 8" X 8" Embossalicious Embossing Folder - Christmas Baubles through my ebosser and cut to 5" square. 


I painted  the ornaments using Spectrum Noir Ink Refills  and a small round tip paint brush. I dropped a small amount of color onto a nonstick palette. I then dipped my brush into alcohol first and pulled some of the color. The colors are so rich and spreads so nicely on the cardstock!  
Ink Refills used: CT3, DR4, and TB4
Markers used: Blender


TIPs:  (1) a little goes a long way, you only need a small amount of color. (2) start painting in the darkest area of the image (3) leave a highlight (4) if you accidentally go outside the line, use the Blender to gently "push" the color back into the image.

I embossed the sentiment to make it pop.... Joy - one of my favorite words!


To see some fabulous projects and get some inspiration, visit the sites below!

To enter for the drawing, please visit Crafter's Companion Facebook Page

Thank you for visiting!!

Take care and STAY POSITIVE!

Friday, December 6, 2013

Crafter's Companion December Challenge - Ribbon (or twine/thread)

This month's Crafter's Companion Challenge Blog theme is Ribbon (or twine/thread).  I'm featuring images from Sheena's A Little Bit Scenic - Flying Colors


I stamped the butterfly image randomly, using a StazOn black ink pad, onto a wide piece of ribbon. 


On  Ultra Smooth Premium White Cardstock, I stamped the sentiment from the set and layered a piece of design cardstock to match the ribbon. 


Every month, there's a fun challenge with a chance to win a voucher to shop at Crafter's Companion. Visit the Crafter's Companion Challenge Blog for all the details on this month's challenge. For inspiration, be sure to visit the Crafter's Companion DT members.  You can see their latest designs by clicking on the names on the left side of my blog..

Thank you for visiting!!

Take care and STAY POSITIVE!