Monday, September 30, 2013

Sheena in the Spotlight - Ageing Beautifully#3

Continuing in my series of Sheena Spotlight posts featuring Ageing Beautifully, I broke out my Spectrum Noir Ink Refills again. I can't help myself - I dig the vibrant backgrounds! :o)


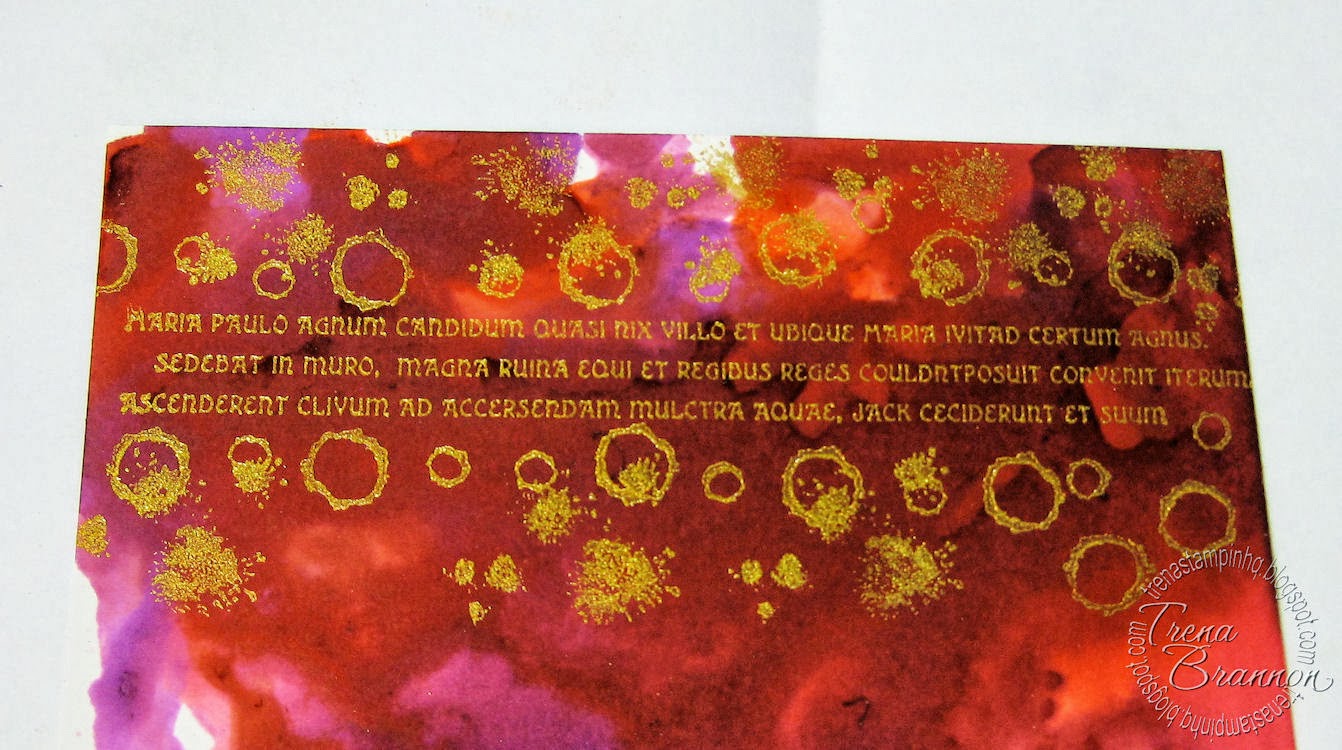
  I dropped the colors of PL2, CR4, and OR2 onto High Gloss Cardstock and blew them around with a straw. 


I spritzed some alcohol, dropped more color where needed and blew some more.


After it dried completely, I inked up the Latin words stamp from the set with a Delicata ink pad (coming soon to Crafter's Companion!) and stamped over the colorful background. NOTE: I used Google Translate to figure out the words. :o)  It's words from nursery rhymes - how cute!


I stamped several of the splatter images above and below words.


On an A2 size piece of glossy cardstock I stamped the sentiment, from Sheena's A Little Bit Scenic - Silhouette Grasses, with the Delicata ink pad, sprinkled with emboss powder and heat set. I used the corner swirl image from that set to frame the card - I stamped off  first for a subtle look.


Inside, I added a piece of the colorful background.


Crafter's Companion has had several new releases. For more ideas, be sure to pop over to the Crafter's Companion Information Blog, as well as visit the Crafter's Companion DT members.  You can see their latest designs by clicking on the names on the left side of my blog.

Thank you for visiting!!

Take care and STAY POSITIVE!

Saturday, September 28, 2013

Create Two Colorful Backgrounds From a Splash and a Kiss

Today, I'm showing you how to create two colorful backgrounds with a splash of color and a kiss. I'll be featuring  images from Sheena's new fabulous release - by the way, we have a blog hop going on where you can win the set of your choice at Crafter's Companion


This really cool tree is from the Sheena A Little Bit Oriental EZMount Stamp Set - Oriental Silhouette. I'm using the same technique I did for the blog hop, with a little twist - or should I say kiss. I inked up the tree image with a Faber Castel Big Brush pen and stamped onto High Gloss Cardstock. The pen is filled with India ink which is alcohol ink friendly - won't smudge.


For the splash, I dropped colors of Spectrum Noir Ink Refills - BT5, LV2 and  TB5 and blew the colors around with a straw. 


spritzed alcohol and added more drops as needed to fill any large gaps of white space.


Here's where the kiss comes in - I laid a clean piece of gloss cardstock on top and gently pressed to "kiss" them together, gave a slight twist and pulled them apart to create two unique backgrounds.


I allowed it to dry completely, and  then added the ground by putting a tiny amount of BT5 on the end of a cotton swab and then applied color horizontally across the scene.


I completed the card by layering it on a white and complimentary colors.


For the second background, I used an image from Sheena's A Little Bit Scenic - Silhouette Highlands set. Since the alcohol ink was dry, it was ok to use permanent ink pad to stamp the image.


I used a couple other images from the set and a watermark ink pad to create a subtle boarder on the background layer.


Crafter's Companion has had several new releases. For more ideas, be sure to pop over to the Crafter's Companion Information Blog, as well as visit the Crafter's Companion DT members.  You can see their latest designs by clicking on the names on the left side of my blog.

Thank you for visiting!!

Take care and STAY POSITIVE!

Friday, September 27, 2013

A Lot of Coloring - Don't be Scared!

Even for those of us who love to color, seeing an image that requires a lot of coloring can kind of scare us.  My approach is to "chunk it up" -  identify chunks to color.  To help explain my approach,  I'm featuring images from Sheena's A Little Bit Sketchy EZMount Stamp Set - The Boat House


  For color inspiration, I used the colored panel the image came on - one of the wonderful features of ordering sets from Crafter's Companion. I pulled out my color chart and the color wheel that I made to help me select the Spectrum Noir Marker colors for the scene.  I stamped the images onto Ultra Smooth Premium White Cardstock.


  Working within one area - defined as a piece of the scene where colors will be blended -  I starting coloring with CT1, CG3 and JG2.  I used a combination of direct coloring to the cardstock and also pallet coloring - scribble a darker color onto an acrylic block and pick up with a lighter color. As you lay the color on the cardstock, the color starts out as dark and a natural blending occurs as the marker returns to its lighter color.  To see a video of this method of coloring, click here.  


I continued with the same color pallet of the three markers to complete all the areas for that color combination.


Next, I colored the golden brown bushes using CT1, GB2, GB8, GB9, and GB10. TIP: in some areas, using a light touch, I dabbed in a darker color and then dabbed over it with a lighter color to create a little bit of texture.


Filled in more areas using a different combination of colors already in the scene: CG3, GB2, GB8,  and JG2.


Added more colors. CG3,  JG2, LV1, LV3, PP5, and PP6


I finished off the land with BG2, CG3, GB2, GB8, TN2, and TN5


I added color to the water and sky with TB1 and blender. The sailboat is colored with LV1, TN2, TN5, and TB1. I used Double Sided Adhesive Foam Circles to pop up the sail boat.  The sentiment is from the set.


Crafter's Companion has had several new releases. For more ideas, be sure to pop over to the Crafter's Companion Information Blog, as well as visit the Crafter's Companion DT members.  You can see their latest designs by clicking on the names on the left side of my blog.

Thank you for visiting!!

Thursday, September 26, 2013

Sheena - A little bit Oriental Blog Hop

Hello CC fans! Today we are excited to launch another gorgeous collection from Sheena Douglass called “A  Little Bit Oriental”. This collection has four beautiful stamp sets, four 5x7 embossing folders, a paper pad with 48 sheets of coordinating pattern papers in 16 designs. All of these wonderful new products are available right now on the Crafter’s Companion website.


To celebrate this wonderful new release, the designers have been busy making some wonderful projects and we can’t wait to show them off to you. Hop along and don’t forget to leave comments along the way because we will be selecting a random winner who will receive one of the lovely new Sheena Stamp Sets (winner’s choice). Leave your comments by  Monday, Sept 30 at 9pm (ET). The winner will be announced on the Crafter's Companion Information Blog. 

Here is a list of the designer's blogs who will be sharing projects today:

Chrissie Tobas
Christiana Reuling
Denise Coulter
Kendra Wietstock
Leah l'Orange
Mary Dawn Quirindongo
Roxanne O’Brien
Stacy Harper-Watson
Stephanie Severin
Trena Brannon (U R HERE!)
Tenia Nelson
Deb Felts (Guest Designer)

I'm featuring images from the Sakura and Oriental Silhouette sets. 


I inked up the tree image with a Faber Castel Big Brush pen and stamped onto High Gloss Cardstock. The pen is filled with India ink which is alcohol ink friendly - won't smudge.

I then dropped colors of Spectrum Noir Ink Refills - OR1, LV1,  and PP1 and blew  the colors around with a straw. I added more drops as needed to fill any large gaps of white space.  I then spritzed the whole scene with alcohol. I added a thin line of OR1 along the bottom  to create a ground (the dropper tops are wonderful for lines!) and dabbed with a paper towel to create a subtle textured ground.


I stamped the small medallion image onto gold cardstock, cut it out with a punch and popped it up  Double Sided Adhesive Foam Circles.


Please hop around to see all the fabulous projects featuring new Sheena's new images and have a chance to win.

Crafter's Companion has had several new releases. For more ideas, be sure to pop over to the Crafter's Companion Information Blog.

Thank you for visiting!!

Take care and STAY POSITIVE!

Wednesday, September 25, 2013

Sheena in the Spotlight - Ageing Beautifully#2

 For this Sheena Spotlight project with  Sheena's A Little Bit Sketchy EZMount Stamp Set - Ageing Beautifully, I'm designing with ceramic tiles and Spectrum Noir & LUXE  inks.


I picked up some distressed looking tiles from my local Home Depot store. First, I cleaned the tiles with alcohol.  Next, I dropped in lovely, rich color - TB4, BT4, and JG2.  Spectrum Noir Ink Refills have a dropper top which makes it so simple for these type techniques!


I picked up the tile and tilted it around to move the ink together and blend.  I put a tile underneath to catch any ink than ran off.  I added more drops of color as needed. I followed this process until all the tiles were full of color. NOTE:   My fingers got really inky! :o) The ink moves so quickly on the tile. I used my finger to fill in color around the edges. 


After everything dried completed, I stamped images randomly from the set in black and white, using Memento LUXE Mixed Media ink pads - coming soon to Crafter's Companion


To seal the ink, I painted the tiles with a varnish.

Shout Outs: Cathy Taylor, June Rollins, and Patti Parrish.  I've learned some great tips from these lovely, talented women.  Click on there names to see their artwork. 

Organization Tip: I store my ink refills in two of my craft storage drawers. I put them in order to match the color chart and use pieces of card board to keep them in rows. I wrote the numbers on the drawer so I could quickly find the colors I'm looking for. I admit I'm a bit of an organizational enthusiast. :o)  I like to spend less time looking for the right color and more time coloring. 


Crafter's Companion has had several new releases. For more ideas, be sure to pop over to the Crafter's Companion Information Blog, as well as visit the Crafter's Companion DT members.  You can see their latest designs by clicking on the names on the left side of my blog.

Thank you for visiting!!

Take care and STAY POSITIVE!

Monday, September 23, 2013

Sheena in the Spotlight - Ageing Beautifully#1

If you follow my blog, you can probably tell that I'm a big-time Sheena groupie. I just love creating with her images! I'm going to start featuring her sets in a Spotlight series of blog posts - starting with Ageing Beautifully


I'll be using a variety of coloring techniques, as well as there may be times I include additional Sheena sets as part of my overall design.   For this design, I started with my lightest color and a piece of  Ultra Smooth Premium White Cardstock. I applied color with a blending tool and a light touch.  TIP: leave some white space somewhere in your scene for a background highlight.


I applied the next layer of color around the edges and created a horizon line and mountain using paper edges and torn paper as masks.


I deepened the color around the edge and added a closer mountain range.


Next, I added the ground with the cracked image in the set. To make the ground subtle, I stamped off.


 To give the illusion of trees along the base of the mountains, I used one of the corner boarders in the set and a stamp positioner.


 I cut the card to size and used the other corner border around all the edges.


To help frame the scene, I added branches and foliage from Sheena's A Little Bit Scenic - Silhouette Highlands set.


On the inside I added a strip of the scene.


Crafter's Companion has had several new releases. For more ideas, be sure to pop over to the Crafter's Companion Information Blog, as well as visit the Crafter's Companion DT members.  You can see their latest designs by clicking on the names on the left side of my blog.

Thank you for visiting!!

Take care and STAY POSITIVE!

Friday, September 20, 2013

New Sheena Sneak Peak!

Sheena has a new release of four fabulous Oriental sets!   What excites me most about these sets is that they will have matching embossing folders and designer papers!


I stamped this lovely branch and flowers from the Sakura set onto a vellum paper. I dabbed a corner of Rich and Radiant Delicata ink pad onto my non-stick craft sheet and used a paintbrush to pick up color and apply to the backside of the stamped image.


After it dried, I turn it over and added more gold to the pedals.  While I was waiting for the ink to dry, I worked on my background layer. I ran the the 5" X 7" Embossing Folder - Circle Background with Ultra Smooth Premium White Cardstock  through my ebosser.  Next, I layered the vellum piece over a piece of  High Gloss Cardstock and cut to size. I used the brads from my stash to "adhere" the vellum to the cardstock and layered it over a piece of gold cardstock.  I added a sentiment from the same set to this card and popped it up with dimensional dots. It was stamped on vellum and layered over gold cardstock. I like both with and without the sentiment. :o)


There are so many beautiful images in this release! For more ideas, be sure to pop over to the Crafter's Companion Information Blog, as well as visit the Crafter's Companion DT members.  You can see their latest designs by clicking on the names on the left side of my blog.  I'll also be sharing more next week!

Thank you for visiting!!

Take care and STAY POSITIVE!