Tuesday, November 25, 2014

All About Cupcakes

It's Black Friday All week at Crafter's Companion! We are celebrating with the fantastic new Cupcake Templates.  I just like word "cupcake!"  It warms my heart - I have wonderful memories of baking cupcakes with my mother. The templates make fabulous packages to present your cupcakes in, as well any item. My design today features the Cupcake Templates Collection - Twin Cupcake Presentation Box.  You can put one big cup cake in it.


 Or, two regular size cup cakes fit nicely in the tray.


I followed the easy directions that came with the template, using beautiful Construction cardstock - 12" x 16". I secured the template with EZRelease Tape before tracking it.  


I used The Ultimate Tool to score the dashed lines, folded them up and used the Scoring and Embossing Tool that comes with the tool to burnish down the folds for a nice crisp edge. To create special design paper, I ran the Embossalicious Cakes Galore through my eBosser on Shimmering Cardstock rose pearl. I laid on top of a layer of Shimmering Cardstock black pearl. I used Red Liner tape to adhere the sides of the box.
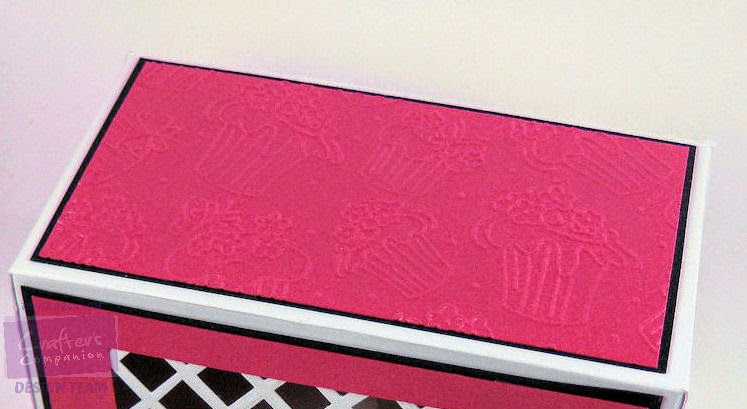

For the window, I used Die'sire Create-A-Card Dies - Ornate Lattice~Treillage Fleuri on Ultra Smooth Premium White Cardstock, layered the rose over black and added a layer of the two colors to the inside lid.


Next, I traced the inner cup cake tray onto a piece of the  Construction cardstock. I scored the dashed fold lines and burnished them, as above. For the holes I used the Die'sire Create-A-Card Die Forget Me Not~Myosotis. 


 The flower is cut from Shimmering Cardstock pink pearl using the Die'sire Create-A-Card Die Forget Me Not~Myosotis. I added a little shading to the pedals with Spectrum Noir Blendable Colored Pencils 034.


To create this cute little fence wrapper, which you can put around a cupcake, I used Die'sire Decorative Dies Picket Fence Cupcake Wrapper. My little happy cupcake was a bit too fat to fit into the fence, however he was quite happy to sit beside it. :)


Crafter's Companion has had several new releases. For more ideas, be sure to pop over to the Crafter's Companion Information Blog, as well as visit the Crafter's Companion Education  and Inspiration Team members.  You can see their latest designs by clicking on the names on the left side of my blog.

Thank you for visiting!!

Take care and STAY POSITIVE!


Sunday, November 23, 2014

Sugar & Spice & Shimmer

Sharing another sneak peek! This one is sweet with cupcakes, butterflies and flowers featuring Embossalicious Cakes Galore and Die'sire Dies Cupcake Insert Flower~Fleur.


After running the folder through my eBosser on Shimmering Cardstock sky blue I colored the background with Spectrum Noir Blendable Colored Pencils 017, 030, 034.  The flowers are cut from Shimmering Cardstock pink pearl, yellow pearl, rose pearl, I added a little shading to the pedals with the pencils.


On the inside, I added a matching cupcake I cut out from the background.


Crafter's Companion has had several new releases. For more ideas, be sure to pop over to the Crafter's Companion Information Blog, as well as visit the Crafter's Companion Education  and Inspiration Team members.  You can see their latest designs by clicking on the names on the left side of my blog.

Thank you for visiting!!

Take care and STAY POSITIVE!


Thursday, November 20, 2014

Create-A-Card - A Fabulous Card!

My design today features a sneak peek of two fabulous Die'sire Create-A-Card Dies - Ornate Lattice~Treillage Fleuri and Forget Me Not~Myosotis.


For the base card, I used a piece of Ultra Smooth Premium White Cardstock - 8.5" x 5.5".  This is the perfect size to use with the Create-A-Card dies for layering. Before running it through my eBosser with the  Ornate Lattice~Treillage Fleuri die, I laid a piece of wax paper between the die and the cardstock.  The wax paper helps to achieve a nice crisp cut for all the pieces. 


I lined up the edge of the cardstock with the edge of the die and taped it in place with EZRelease Tape.


Next, I ran the Forget Me Not~Myosotis die pieces through my eBosser using cardstock from the new Shimmering Cardstock release - Coastal Pearl, Yellow Pearl and Rose Pearl. Love that shimmer!


I cut a piece of the Shimmering Cardstock Rose Pearl to fit the front of the card and glued it to the inside of the base card with Collall All Purpose Glue. This also makes a cool inside of the card - two tone.


I slide a white brad from my stash through the center hole, used Collall All Purpose Glue for the leaves, and popped up the flower die with Double Sided Adhesive Foam Circles.


Crafter's Companion has had several new awesome releases to celebrate the Holiday season. For more ideas, be sure to pop over to the Crafter's Companion Information Blog, as well as visit the Crafter's Companion Education  and Inspiration Team members.  You can see their latest designs by clicking on the names on the left side of my blog.

Thank you for visiting!!

Take care and STAY POSITIVE!


Saturday, November 1, 2014

Crafter's Companion November Challenge-Christmas/Winter

This month's Crafter's Companion Challenge theme is Christmas/Winter.  I'm featuring images from Sheena's A Little Bit Sketchy Line and Sentimentals Christmas Line.


I stamped the bird on a branch image from A Little Bit Sketchy EZMount Stamp Set - Faith onto watercolor paper with Memento LUXE Ink Pad - tuxedo black, sprinkled with emboss powder and heat set.


I taped the paper down with a low tack tape to create a border. I taped it onto a board so I could easily move the piece around without touching it. The bird and branches are water colored with Distress Ink Pads.  I 'stamped' the pads onto my non-stick craft mat and picked up color with a water-brush. 

bird: salty ocean, scattered straw
branches, pine cone: vintage photo

For the snowy hills and sky I sponged in tumbled glass with an Ink Sweeper.  I used a torn piece of paper as a mask the snowy hills, starting on the torn paper and pulling color onto the scene with a light touch.


For the sky, I masked a horizon line with a piece of paper and used a light touch in a horizontal motion, pulling coloring from the outside into the center, leaving a highlight.  I pulled the tape off to reveal the border.


I stamped the branch from the set in the corner with Memento LUXE Ink Pad - tuxedo black, sprinkled with emboss powder and heat set. I colored with Spectrum Noir Blendable Colored Pencils 060, 111. I used 065, 017 to add some definition to the little bird. I also added definition to the larger branch the bird was sitting on with 111.  The sentiment is from Sentimentals Christmas Stamp Set - Jingle Bells.


Every month, there's a fun challenge with a chance to win a voucher to shop at Crafter's Companion. Visit the Crafter's Companion Facebook Page for all the details on this month's challenge. For inspiration, be sure to visit the Crafter's Companion DT members.  You can see their latest designs by clicking on the names on the left side of my blog..

Thank you for visiting!!

Take care and STAY POSITIVE!