Saturday, August 31, 2013

Teaching Ink Buffet Class

I'll be sharing how I create my inky backgrounds. Please click on the photo for all the details:


Hope you  can join me!

Thanks for visiting!

Take care and STAY POSITIVE!

Friday, August 30, 2013

Creating a Color Wheel with Your Spectrum Noir Markers

Last week/weekend, I had a wonderful, colorful, awesome experience at the Chicago CREATE Mixed Media Retreat.  One of the most valuable things I learned was how to read a color wheel. You'd think as much as I love to color, I would have figured that out by now and be using it! :o)   We made one in class with our watercolor paints. I decided to create one with my Spectrum Noir Markers.


 I think it will be very helpful with my color selection when coloring and for the Spectrum Noir Ink Refill designs I love to create. The first thing to do is draw a color wheel on the same paper you'll use most often. You can use a compass, a template, a die cut or punch. One of the things I picked up at the retreat was a cool shade outline stencil  from StencilGirl that I could use for this purpose. I traced my color wheel onto Ultra Smooth Premium White Cardstock for Alcohol Markers with a pen that had India ink in it. India ink is an alcohol friendly ink - stays in place.


Next, I used my SN color chart to pick out the marker colors to match the 12 colors on the color wheel, noted them and colored. I used the fine tip to outline the section and the chisel tip to fill in quickly - makes it a quick project. Took longer to write this post than color it in. hehehe.


NOTE: the circled numbers on my SN color wheel correspond a color family. I  labeled my original color wheel with a unique number for each color family. It is consistent across all the methods of my coloring, i.e. markers, water coloring, Twinkling H2Os, acrylics, etc...  I learned that in my color theory class with Jacqueline Newbold. Great tip!


You can see the highlights of my Create Retreat fun over at Stamping, Painting, & Coloring Make me Giggle

To see many wonderful techniques using Spectrum Noir Markers and ink refills, click on the label on my sidebar, visit  the Spectrum Noir Blog, the Crafter's Companion Information Blog, as well as visit the Crafter's Companion DT members.  You can see their latest designs by clicking on the names on the left side of my blog.  So many places to get techniques, ideas and inspiration!

Thank you for visiting!!

Take care and STAY POSITIVE!

Friday, August 23, 2013

Bright, Vibrant Background

My design today has a bright, vibrant background and features images  from the Camden Town EZMount Stamp Set - Male 2.


 I started with the background, using Memento re-inkers on Ultra High Gloss White Cardstock. I dropped colors in one section at a time, spritzed water, then blew the color around with a straw. I really dig the vibrant colors. 


Next, I stamped the bike image from the set onto water color paper, sprinkled emboss powder and heat set.  I colored them with  the the re-inkers. I dropped color onto a pallet and used a paintbrush dipped in water to apply.


Crafter's Companion has had several new releases. For more ideas, be sure to pop over to the Crafter's Companion Information Blog, as well as visit the Crafter's Companion DT members.  You can see their latest designs by clicking on the names on the left side of my blog.

Thank you for visiting!!

Take care and STAY POSITIVE!

Friday, August 16, 2013

Enchanted Doorway - New Release From Sheena!

My design today features images from one one of  Sheena 'A Little Bit Magical' sets. This fabulous doorway and mushroom are from the Enchanted Doorway set.


I stamped the images onto Ultra Smooth Premium White Cardstock for Alcohol Markers and colored them with my Spectrum Noir Markers. I used a combination of direct coloring to the cardstock and also pallet coloring - scribble color onto an acrylic block and pick up with a lighter color. As you lay the color on the cardstock, a natural blending occurs.  To see a video of this method of coloring, click here.
shroom top: CR5, DR3, DR7
shroom base: EB1, EB4
grass: JG1


I stamped the doorway image onto design paper, stamping off first.


I used a white gel pen to add back in the white dots on top of the shrooms and also added more grass and ground with JG2, EB1.


Crafter's Companion has had several new releases. For more ideas, be sure to pop over to the Crafter's Companion Information Blog, as well as visit the Crafter's Companion DT members.  You can see their latest designs by clicking on the names on the left side of my blog.

Thank you for visiting!!

Take care and STAY POSITIVE!

Tuesday, August 13, 2013

Beautiful Blended Butterflies

Today, my designs feature images from  Sheena's A Little Bit Scenic - Flying Colors set. I am also featuring backgrounds I designed using my Gelli Plate.


   I stamped the butterfly image three times onto Ultra High Gloss White Cardstock. I used Claudine Hellmuth's Acrylic Rock-A-Blocks Set for a nice crisp image.


I cut them out. and used a black water-based marker to edge them and also thicken their antennas. 


 To create the beautiful color blending, I used Spectrum Noir Ink Refills

Butterfly #1 CT2, OR1, OR2 - traditional Monarch butterfly colors. I dropped color and let it spread and blend by itself. TIPs: (1) I used a scrap piece of gloss card stock under the images to catch any extra color. It also acts as a base that you can pick up gently to tilt your butterfly so the colors run together. (2) You only need a small amount of ink - a little goes a lonnnnng way. If you drop more ink than you want, dip the corner of a clean a paper towel into the area you want to pull color out.


Butterfly #2 DR3, GB4, TB6 -I spiced the color up a bit and also spritzed a little alcohol to help the blending.


Butterfly #3 LV1, PL1, PL3 -  spritzed a little alcohol to help the blending.


After they all dried, I inked up the butterflies with a watermark ink pad, sprinkled ultra thick embossing enamel over them, and heat set. I then repeated for high gloss finish.


Background #1.. To create the background layer I started with a design I created using my Gelli Plate. You can see how I did it here.  Here's what the base looked like:


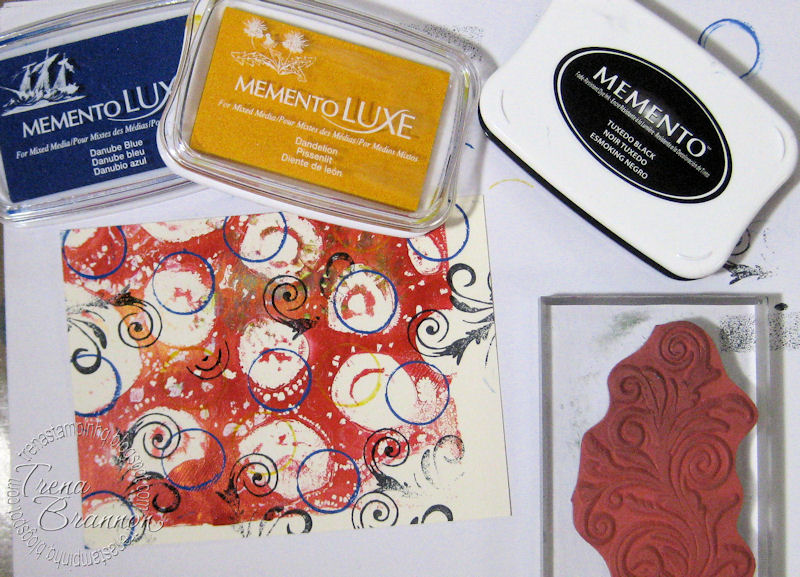
Next, I cut a section and used a combination of inks, including some rich LUXE color (available soon at Crafter's Companion), daubers, and found items (including a pizza box plastic thingy [which I did wash before using :o) ]) to add color and more design elements.


Background #2. It also started with a design from my Gelli Plate.


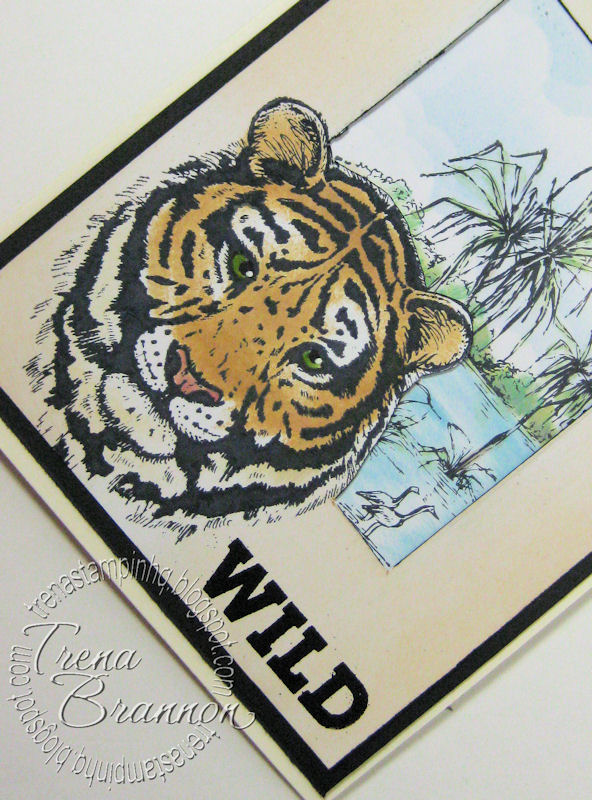
I used more luscious LUXE inks and also another image from the Sheena set - just inked up a small part to add pops of black.


Background #3. I started with the scrap piece of high gloss cardstock I used to catch ink from the butterflies, spritzed it with alcohol and dropped in more color - DR3, LV1, PL1, TB6.  I was a little heavy handed and dropped more color than I intended - this is how I discover tips to share. :o)  When I was pulling up color with my paper towel, I started dabbing and found I liked the texture it created, so I dabbed a lot.  I know, it's looks kinda funky now, but stay with me!


I cut the portion I wanted to use and ran it through my eBosser with the 5" X 7" Embossing Folder - Circle Background.  Next, I slid a LUXE wedding dress ink pad across the top so the color would catch on raised design. It got a little color the pad, but that's ok. I wiped of the color with a paper towel. White ink is ready for the next project.


On the inside of each card, I added a strip of design paper to match the outside. To adhere the butterflies, I used Collall's Tacky-Glue in the center, allowing their wings to be free.


No waste! I'll save all the design pieces I did not use today for other projects!

Shout out:  The butterfly technique was inspired by something I saw over at Deanna's Creations.

Crafter's Companion has had several new releases. For more ideas, be sure to pop over to the Crafter's Companion Information Blog, as well as visit the Crafter's Companion DT members.  You can see their latest designs by clicking on the names on the left side of my blog.  We have two new members this season  Tenia and Leah - and they are awesome!!

Thank you for visiting!!

Take care and STAY POSITIVE!

Monday, August 12, 2013

Happy Birthday Crafter's Companion USA!!

This week Crafter's Companion USA is celebrating their 6th  birthday - woo hoo!!


They are celebrating by having several specials. You can get this cute new stamp set from the Stamp It line for free. Check out the store site to see how.


I stamped the images onto Ultra Smooth Premium White Cardstock for Alcohol Markers and sponged inks using torn paper and scalloped die cut paper as masks to create the little scene.

Pop over to Crafter's Companion to see all the deals. For more ideas, be sure to visit the Crafter's Companion Information Blog, as well as visit the Crafter's Companion DT members.  You can see their latest designs by clicking on the names on the left side of my blog.

Thank you for visiting!!

Take care and STAY POSITIVE!

Friday, August 9, 2013

August CC Challenge - Animals

This month's Crafter's Companion Challenge Blog theme is Animals (include a critter on your project).  My animal of choice - a tiger! 


 I stamped the tiger image from Stamp-It Australia EZMount Stamp Set 68 - In The Wild onto Ultra High Gloss White Cardstock. On a second piece of gloss white card stock, I stamped a water scene image from Stamp-It Australia EZMount Stamp Set 70 - Lucious Landscapes 


To add color, I used Memento ink pads - applied with a stylus and little brush point tools.  I dig how vivid the ink is on the glossy cardstock.


After coloring, my next step was to plan the layout. I trimed the tiger layer and black layer to their final sizes. I then used a ruler to draw in a pencil line for the frame, thinking about how much of the little scene will show. I then cut out the center section with a craft knife using a metal ruler as a straight edge.


I placed the frame over the colored scene and drew a very light pencil line inside the frame. I cut about  3/4 of an inch wider than the line to allow for adhesive. I added some subtle clouds in the sky with a cloud template made from a scallop die. TIP: I start on the template and pull into the sky, using a light touch to avoid blotches of ink.


I sponged color around the frame to tone it down and used a black water based marker to edge the inside and outside of the frame.


For finishing touches, I darkened his pupils with a black fine liner and added a white highlight with a white gel pen.  I really dig his intense look.  I heat embossed a word stamp from the In The Wild set.


Every month, there's a fun challenge with a chance to win a voucher to shop at Crafter's Companion. Visit the Crafter's Companion Challenge Blog for this month's challenge. For inspiration, be sure to visit the Crafter's Companion DT members.  You can see their latest designs by clicking on their names on the left side of my blog.

Thank you for visiting!!

Take care and STAY POSITIVE!

Monday, August 5, 2013

Blog Winner!

Thank you everyone for your comments on my Welcome New CC DT Members post! The winning is comment #: 


-----------------------

Blogger Pat Moore said...
Great card - great set. I love your way to celebrate. 
August 3, 2013 at 2:12 PM
-----------------------
Prize:

Congratulations Pat! Please send your snail mail address to: tlynn@wideopenwest.com.

Thanks for visiting!

Take care and STAY POSITIVE!

Friday, August 2, 2013

Wisdom

I love this huge tree with all the details of the branches.


I created the background first.  I dropped Spectrum Noir Ink Refills onto Ultra High Gloss White Cardstock and blew it around with a straw, spritzing alcohol to help blend and move color. I did the grass first and then added the sky, allowing the colors to run together and leaving some white spaces. I blew in a horizontal direction, which created some abstract cloud formations. This is a fun and forgiving technique.  If you are not happy with the results, you can spritz more alcohol and blow the color around more.


After it dried, I inked up the tree - lightly inking the ground. I dabbled off some of that ink from the ground with a paper towel.  I wanted the black on the ground to be subtle so that the SN ink remained vivid and did not get covered up.  TIPs:  If there are any areas that do not get a solid imprint, use a cotton tip to dip in ink pad and fill in black ink.  When I trimmed my image, I turned it face down so I would not get any lines in the ink.


NOTE: be sure to work in a well ventilated area. the smell of the alcohol can sometimes be strong.

Crafter's Companion has had several new releases. For more ideas, be sure to pop over to the Crafter's Companion Information Blog, as well as visit the Crafter's Companion DT members.  You can see their latest designs by clicking on the names on the left side of my blog.

Thank you for visiting!!

Take care and STAY POSITIVE!

Thursday, August 1, 2013

Welcome to New Crafter's Companion DT Members!

Today we welcome our new Crafter's Companion Design Team Sisters - Leah and Tenia !  In celebration,  EACH DT member is giving away a stamp set.

I'm giving away Camden Town EZMount Stamp Set - Female 2

Camden Town EZMount Stamp Set - Female 2

It has so many cute images!


Spectrum Noir Marker colors:
champagne: CT1, CT3, GB3, GB6
tag, glass: IB1, blender
flowers, ribbon: PP2, PP3, PP4
bottle label: BT2, BT4


To enter, please leave me a comment, with your email address included, by Sunday, August 4th 9pm Pacific

Here's a list of all the DT members:

Mary Dawn Quirindongo -- http://mypinkmexico.blogspot.com
Stacy Harper-Watson -- http://scrapwithstacy.blogspot.com/
Trena Brannon -- http://trenastampinhq.blogspot.com (you are here!)

Visit them to see what they are giving away and be sure to leave them comments for a chance to win. 
It's so much fun to get free stuff! :o)

Crafter's Companion has had several new releases. For more ideas, be sure to pop over to the Crafter's Companion Information Blog.

Thank you for visiting!!

Take care and STAY POSITIVE!