Showing posts with label Copic Markers. Show all posts

Tuesday, September 3, 2013

Simply Wonderful


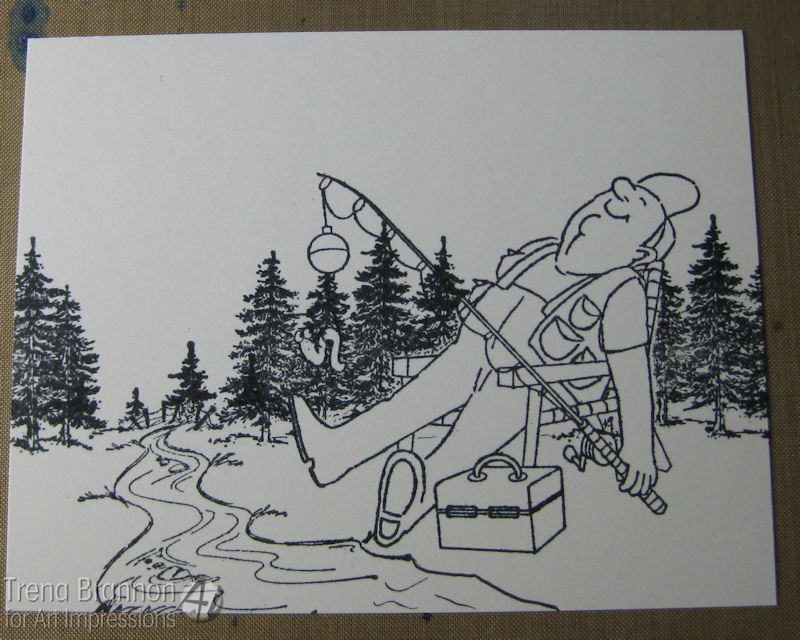
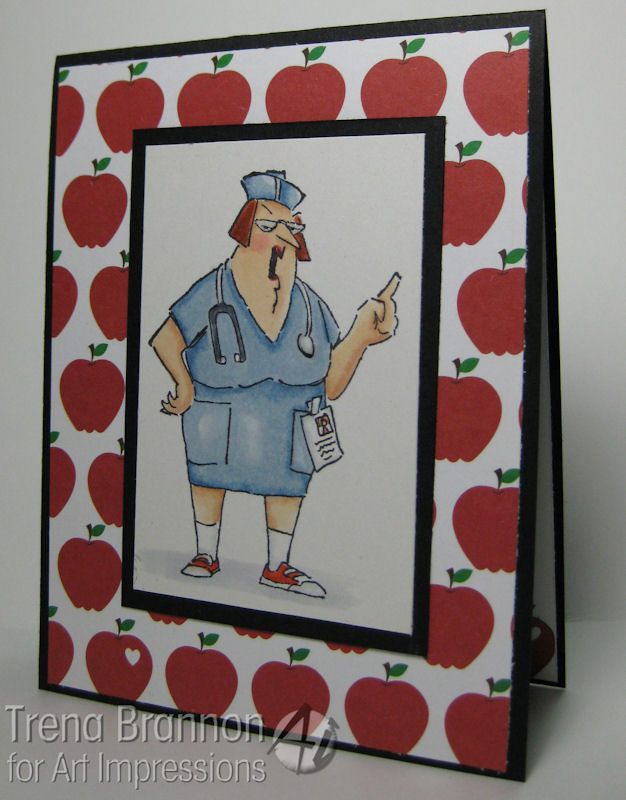
I created this design card for a Style Challenge - Colors: Red, Orange, Kraft / Element: Apples when I was on the Ai DT. My DT duty ended, but Ai is still near and dear to my heart.  I stamped the Picket Fence (Sku#G1215) in white craft ink onto craft cardstock, sprinkled with emboss powder and heat set. 


Next I colored with markers.  For the very small section, I lightly dabbed color in.  The alcohol markers blend nicely on the craft cardstock. For areas where I colored over the image, I used the 0 blender to remove the color.  NOTE: I usually use clear embossing powder with my alcohol markers. I thought white would be ok, since it's almost clear.  :o) I do not use my markers with color or metallic embossing powders.


I cut my circle before stamping Flying Ducks (Sku#I3256). The sentiment if from the Lakehouse TF (Sku#4204) set. I cut around the sentiment with my paper trimmer. I added the embossed line by setting in my paper trimmer and using an embossing tool in the little track to create a straight embossed line.


On the inside of the card, I added Apples (Sku#AA3290) in a Wooden Barrel (Sku#F1730).   I stamped the barrel first, sprinkled with embossing powder and heat set.  I masked the top with a paper towel and stamped the apples to look like they were inside. I sprinkled with embossing powder and heat set.  I masked those apples and the barrel, stamped the apples one more time, sprinkled with embossing powder and heat set.  And then, I colored. :o)


Thanks for visiting!

Take care and STAY POSITIVE!

Tuesday, June 11, 2013

More Graduation Cards and Blog Candy!

I've been designing more graduation cards! We know so many people graduating - from high school and college and we are proud of all of them! 


To see the details of how to make this cute money/gift card holder, click here

To help celebrate graduations everywhere, I'm giving a way this adorable Ai This is Huge Set (Sku#4288) for you to make a special cards!!


To get in the random drawing:

1. Please leave me a comment telling me your favorite Ai image/set by June 16th 6pm central
2. Be a follower of my blog
3. Have a USA address

On Monday June 17th, I'll share the winner's name. 

Thanks for visiting!

Take care and STAY POSITIVE!

Thursday, June 6, 2013

Art Impressions Challenge - Fabulous Brads, Eyelets and Gems

For the current Art Impressions Blog challenge they are doing a cool product swap with  Eyelet Outlet.  I designed a fishing scene that I believe captures the sport. :o)


 I stamped the main image from the Catching Zs Set (Sku#4161) and masked him using both tape (larger areas) and liquid (very small ares). Next, I stamped the Creek (Sku#i1492) and Sm. Forest (Sku#E692) in the background.   For the trees way off in the distance, I used a paper towel to mask and stamped the top port of the forest set. Before removing the liquid mask, I dabbed a tissue over it to remove the ink and the pulled it off - to start it, I used an adhesive remover.


Next, I added color with Copic Markers.  I added grass from the WC Foliage Set (Sku#4051). I stamped a little pot from the WC Series 6 Set 2 (Sku#3498) for the fish to sit in.


I laid the Trout & Bass Brads on top of the little scene and thought about placement and where I needed to put the holes for the brads. I used a push pen to make the holes so I could see exactly where I was putting them. I added the sentiment from the Z's set. For final touches,  I used a glitter pen to add a little sparkle in the water, a glaze pen to highlight the little worms eyes, and a multiliner pen to create a slash from the fish jumping to get the worm.


Please pop over to the Art Impressions challenge for this week to see a bunch of inspirational ideas using brads, eyelets and gems!  You can enter for a chance to win a coupon!!

Thanks for visiting!

Take care and STAY POSITIVE!

Tuesday, May 28, 2013

Comfy With My Girlfriends

This week I'm hanging out with Girlfriends!  They are having an old fashioned sleep over - staying up late, popcorn, and of course, lots of laughing.


 I stamped the Comfy on Couch Set (Sku#4050)  main image onto Cryogen cardstock and colored all the girl's skin with markers. I stamped the same image on a variety of design papers from GF Card Kit 2 (Sku#4303).


I cut out pieces for their clothing and adhered with liquid glue. TIPS: If you find a piece is not fitting just right next to another piece, trim it closer and use a black pen or mulitiliner to thicken the black line. That way any white space will be covered.  To add some variation in color, use the markers to color over areas of the design paper. To get glue in small areas, use a tool pick.


This perfect sentiment comes with the set.


Below is a photo of all the colors I used: 


Come back tomorrow to see what lovely project Crystal has to share!

Thanks for visiting!

Take care and STAY POSITIVE!

Thursday, May 23, 2013

Art Impressions Challenge - Show Your Bow

This week's Art Impressions Blog challenge is Show Your Bow.  Maude (Sku#I1238) is showing her Style (Sku#D3469) - as only she can, in this design.


 I stamped the image onto Cryogen cardstock and colored with markers. I decided to make two cards at the same time - might as well color two images since I have the markers out.


For her stylish bows, I colored little pieces of twine with markers. The twine and all design papers/cardstock are from the GF Card Kit 2 (Sku#4303).  


On the inside of each card, I put a strip of design paper.


Please pop over to the Art Impressions challenge for this week to see a bunch of inspirational Show Your Bow ideas!  You can enter for a chance to win a coupon!!

Thanks for visiting!

Take care and STAY POSITIVE!

Tuesday, May 21, 2013

You Did It!!

This week I'm designing graduation cards. I'm featuring the newly released This is Huge Set (Sku#4288)


 Isn't he adorable? And, he would make any graduate smile!  My experience has been that a grad's favorite  gift is money - that way they can pick out exactly what they want/need. :o)  This design will also work well for a gift card.  I colored him with Copic markers, I darkened his eyes and his smile with a multiliner and then cut out the image.


Next, I gathered my supplies and cut the base card to size. Based on my A2 size envelop, I cut the base card 6.5 x 5". I chose design paper and some ribbon from my stash to complement the little elephant.


I folded the base card and envelop in half and adhered one side of the envelop to the base card. For the second side, I put adhesive envelop side and folded the base card down on top.


I stamped a sentiment from the set on the inside.

Thanks for visiting!

Take care and STAY POSITIVE!

Tuesday, May 14, 2013

Nurse Norma says....

I'm working on a design for my children.


 They don't listen to me about eating healthy choices - perhaps they will listen to Nurse Norma (Sku#L4087). She has the look and attitude of authority - perhaps we all need to listen. :o)  I stamped her on Cryogen and colored with Copics. I also drew some detail on her little badge.


I chose the apple background because apples are associated with health - thinking (hoping) my children will make the connection and eat more apples than candy and french fries.   On the inside, I added a sentiment that I printed on my computer and an apple from the design paper.  The sentiment is something I tell children I know starting when there are little.


I added a couple final touches with glitter to her lips and denominational medium to her glasses and stethoscope.


Thanks for visiting!

Take care and STAY POSITIVE!

Thursday, May 9, 2013

Art Impressions Challenge - "Theory of Negativity"

This week's Art Impressions Blog challenge is "Theory of Negativity." 


 Ai is asking you to turn your negative pieces into positive artwork! Their "Theory of Negativity" (very scientific ☺) is defined as using the negative space from die cuts or punches. Take the remnants from your 'empty' shapes and add them to your creations or use the pieces as stencils for a new project! Each project needs to have an empty piece shown on the project or a picture of how you used the negative space. 

For my interpretation of the challenge, I started with the base card. I cut the cardstock for an A2 size base and drew a pencil line to mark the fold. Next, I used a die cut to randomly cut out stars in the sky.


I masked off a horizon line,  and also at the edge that marked my fold line. I airbrushed in a rich nighttime blue sky. I moved the mask above the horizon line and airbrushed in the grass.


 I stamped the cottage from the Cottage TF (Sku#4202) set, masked it and stamped more trees on each side. TIP: I used a stamp postioner to place the extra trees just where I wanted.


 I added some blades of grass with Teeny Tiny Grass (Sku#AAA1374).  I added random white dots with a gel pen to create many more stars way off in the distance. Some of them smeared a little - those are the shooting stars. :o) hehehe. I colored in the little cottage, cut it out, trimmed the edge with a black marker and adhered it over the background.   I stamped the little cute sentiment from the set and also edged it with a black marker.


On the inside added another image from the set. NOTE: I stamped it off twice to make it subtle.


Please pop over to the Art Impressions challenge for this week to see a bunch of inspirational  "Theory of Negativity" ideas!  You can enter for a chance to win a coupon!!

Thanks for visiting!

Take care and STAY POSITIVE!

Tuesday, May 7, 2013

At the Circus


Hello Ai Fans! 

This week I'm still hanging out with Girlfriends.


With the warmer weather, there's just so many opportunities to be outside, and Girlfriends are taking advantage of it. This week, the girls are at the circus - enjoying the attractions and each other.  I'm featuring images from the Girlfriend Blend Set (Sku#4132) and colored with Copic markers. After coloring the girls, I cut them out and used a black water based marker around the edge.


I placed them on top of a fun background and added some bling to their jewelry and lips with glitter pens.


On the inside I added matching design paper and stamped a sentiment from the set.


Come back tomorrow to see what lovely project Crystal has to share!

Thanks for visiting!

Take care and STAY POSITIVE!