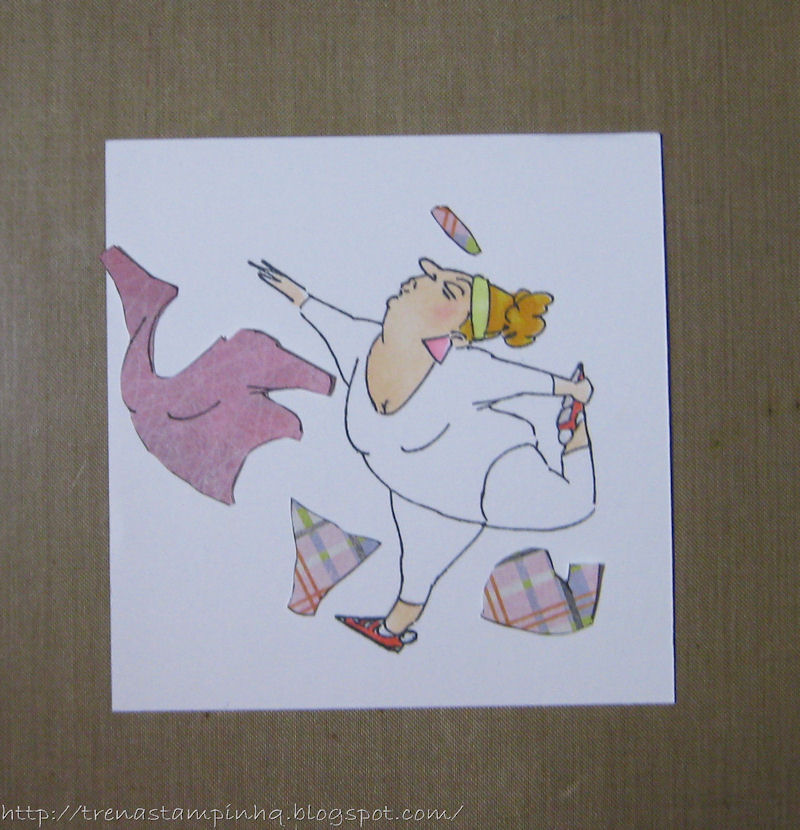
Thursday, September 27, 2012

Art Impressions Challenge - Bunting & Banners

This week's challenge is Bunting & Banners at the Art Impressions Blog.


I made this card for my nieceI stamped the birthday banner window onto Yupo white watercolor .  Yupo paper is a wonderful paper! It has different properties than watercolor paper and with a little practice you'll get to know it.  For water coloring I chose Tombow Dual Brush Pens.  I used a combination of direct [color on paper and spread color with a brush] and in-direct [scribble marker onto a non-stick surface and pick up color with a brush].


For the banner pieces, I laid small pieces of different patterns of the design paper on top of each other and cut one triangle - voila all the same size! :o)   On the inside, I stamped the scroll onto Cryogen card stock and hand drew the letters - I also added the number 5 for her age.  Cryogen is another wonder paper / cardstock. Rather than the water brush,  I used the blender pen, or a lighter shade marker, to pick up color from the pallet.  I think Nyla will like her card!


List of Supplies Used: 
Stamps: Sm. Scroll (Sku#I1988),  Birthday Banner Window (Sku#M3198)
PaperYupo white watercolorCryogenStampin' Up! design & turquoise
Ink/ColoringStazOn jet black in padSakura Micron archival ink penTombow Dual Brush Pens
Accessories: water brush, Spellbinders Die Cuts, white gel pen, Watercolor Palette #WCPLT


Thanks for visiting!

Take care and STAY POSITIVE!

Trena

Tuesday, September 25, 2012

Marvelous


In the Midwest, we are really starting to feel the fall season coming on.  The nights are getting cooler and the leaves on the trees in my neighborhood are the lovely colors of fall.   I really feeling those colors, so I created a scene that captures fall for me. I chose  Sheena's A Little Bit Scenic - Silhouette Country Lane set for my scene. I stamped the images and added a ground mask and sponging black ink - I used a piece of scrap paper for the mask.


After it dried, I cut it to size.  I wanted the crisp color around the edge that happens when you star your blending from the outside edge. Starting with my lightest color and moving far into the center, I used the blending tool to gently swirl color onto the cardstock.  I repeated for each of the colors.


To finish it off, I used the lovely sentiment with the set. I stamped it using VersaFine.  I am such a Sheena groupie! :o) I dig all her scenic sets!

Please visit here to see more inspiration for Crafter's Companion images and to participate in challenges for a chance to win weekly giveaways!

List of Supplies Used: 
Stamps: Sheena's A Little Bit Scenic - Silhouette Country Lane
PaperUltra Smooth Premium White Cardstock for Alcohol MarkersStampin' Up! black
Ink/ColoringTim Holtz Distress Ink PadsVersaFine onyx black ink pad
Accessories: Tim Holtz blending tool

Thanks for visiting!

Take care and STAY POSITIVE!

Trena

Friends Who Laugh

This week I'm working on a card for my girlfriend for the Ai Blog!


We have women in our lives who are special to us - they support us, they encourage us, they tell us the absolute truth (which we need to hear), and they make us laugh. And, we do the same for them. Many of the Girlfriend images captures those moments. I'm using this image because it captures the laughter for me - I just got back from a trip with one of my girlfriends, Gail. We had the most wonderful time!! Our husbands went too. :o) We all had a ball. As we were having breakfast one morning, a woman at the next table said you all are having just too much fun. We invited her over. :o)

I stamped the image onto Cryogen cardstock, colored it with Copics and cut it out. I dig how the images goes outside the white layer.

Copic Marker colors: 0, C00, C5, C9, BV0000, BV00, BV01, BG11, BG13, B91, B95, B97, R02, R37, R81, R83, R85, RV04, E000, E00, E11, E13, E19, E25, YG00, YG03, YG23, Y11

List of Supplies Used:
Stamps - Comfy on Couch Set (Sku#4050)
PaperNeenah Solar WhiteCryogen, Bo-Bunny Design
Coloring/InkCopic MarkersMemento Black ink pad
AccessoriesSpellbinders Die Cuts

Thanks for visiting!

Take care and STAY POSITIVE!

Trena
  

Thursday, September 20, 2012

Art Impressions Challenge - Sports and Fun


This week's challenge is Sports & Fun.  I just love this couple from Art Impressions!  I colored the image, added a paper piece for his pants and adhered the layers.   The sentiment inside was my husbands idea. I printed on my computer and layered over some design paper. 


List of Supplies Used: 
Stamps: T-Golfers (Sku#T3475)
PaperCryogenNeenah Solar WhiteBasic Grey design paper
Ink/Coloring:Memento Black ink padCopic Markers
Accessories: Sakura glitter pen


Thanks for visiting!

Take care and STAY POSITIVE!

Trena
--
  

Tuesday, September 18, 2012

Spectrum Noir Marker Techniques


Today is all about coloring!! A couple weeks ago I shared a fun technique that I learned at the Chicago Create Retreat with alcohol re-inkers. When I was doing it, I thought.... hmmm, one day, I'm going to try this with Spectrum Noir ink refills. Today's the day!! :o)  Jennie reminded me about it and I had to get my ink refills out!! There was also another technique I've been wanting to try with outline stickers and fine glitter - I thought "what the heck, just do both in one project!! :o)  This all comes at a good time because I was looking for something artistic and special to put in a memory book for a wonderful woman I go to church with.

There may be a better of way of doing this part. I'm sharing the way I did it - I had no training. :o) I cut a piece of the two sided tape a little larger than the sticker I planned to use. I laid one sticky side down onto a piece of scrap cardstock.  I peeled the other side off and laid my outline sticker down.  I cut around the sticker. I then sprinkled the glitter, pressed it down, and put the excess back in the bottle. I gently colored with T3, then dabbed in a little T6, and then went back in with T3 where the two blues met. It blended so easily!! I love it!!


Next, the background!!  I liberally spritzed the Yupo paper with alcohol then dropped color onto the paper. The ink refills come with dropper caps which makes this technique so easy. I blew the color around with a straw until I was happy with it. NOTE: If it dries before you are happy with it, spritz with alcohol again. I set it aside to dry. I just love how the blending naturally occurred with the rich, vibrant colors and the texture that was created.  You get a lovely surprise every time!  I kept my background in the "blues" (IB3, TB2, TB5, TB6) this time and I will experiment with more color combinations.


I also tried this same process on glossy cardstock and I like that results too!  Below you can see the glossy looks darker, but that may be a result of me adding more drops of TB6. I'll have to play it more.


I decided to use the Yupo paper for this project.  I picked out the section I liked best and cut it to fit. I'll save the rest and the glossy background for another project.  I added a little more shading to the sticker outline with IG1 and IB3.

Try it, you;ll like it!! :o)


List of Supplies Used: 
PaperYupo white watercolorStampin' Up! glossy & metallic gold
Ink/ColoringSpectrum Noir Marker Refills, Spectrum Noir Markers
Accessories: Sookwang double sided tape, Glitter Ritz transparent micro fine glitter - cool highlight,  drinking straw, alcohol, Elizabeth Craft Designs outline Sticker

Thanks for visiting!

Take care and STAY POSITIVE!

Trena


Outdoor Yoga


Hello Ai Fans! 
This week I'm sharing a little scene with Yolanda. She's enjoying her yoga workout outdoors.


I stamped the images and colored them in with Spectrum Noir Markers. For the background I used ink pads and a blender tool to add color to the grass and sky.  I stamped some grass clumps randomly.


I stamped Yolanda  on white cardstock, and then again on two different design papers. I cut out all the pieces.


I cut her out and placed her in the scene, in the fresh air. :o)  Please come back tomorrow and see what Crystal has for you!!

List of Supplies Used: 
Stamps - Summer CHA release Ai People Yolanda (check your local stamp/scrapbooking store), Picket Fence (Sku#G1215), Lg. Forest (Sku#G689), Grass Clump (Sku#AA1375)
Paper - Ultra Smooth Premium White Cardstock for Alcohol MarkersStampin' Up! black, Basic Grey design paper
Coloring/InkMemento Black ink padSpectrum Noir MarkersTim Holtz Distress Ink Pad
Accessorieswhite gel pen, Tim Holtz Blending tool

Thanks for visiting!

Trena

Take care and STAY POSITIVE!

Thursday, September 13, 2012

Art Impressions Challenge - Rainbow


This week's Art Impression's challenge is Rainbow. What does that look like for you?  For me, I was thinking a meadow with a pot of gold. :o)  I had to have a tree in my meadow, AND the tree had to have  fall colored leaves.

To get my vision, I stamped the tree and colored it. Next, I used a blending tool to add grass and sky with Distress inks. I used more than one shade of color to give the scene some depth.


I stamped the little pot of gold onto gold metallic cardstock. For detailed images, I like to use VersaFine ink. It takes longer to dry, but really captures fine lines.  For the leaves I used Distress inks.

I placed the pot on the scene and drew a light pencil at the top. I set the pot aside and added the rainbow with my Spectrum Noir Markers. I used a plastic curved lid as a guide for my rainbow.  Look around your house for supplies - they are everywhere! :o)

List of Supplies Used: 
Stamps: Tree and Leaves (Sku#T883), Sm. Ceramic Pot (Sku#B3495)
PaperCryogenStampin' Up! basic black & gold metallic, Neenah Solar White
Ink/Coloring:  Memento Black ink pad, VersaFine onyx black ink pad, Tim Holtz Distress Ink Pads,  Spectrum Noir Markers
Accessories: Tim Holtz blending tool

Please pop over to the Art Impressions challenge for this week to see a bunch of inspirational rainbow ideas!  You can enter for a chance to win a coupon!!

Thanks for visiting!

Take care and STAY POSITIVE!

Trena

Tuesday, September 11, 2012

A Snowman and His Village


New Designs are coming out later this week from Sheena!! I love this scene with the snow man and village.  When I saw it, I knew exactly how I wanted to color it - with water color paints.  I had an awesome time a few weeks ago at the CREATE retreat and have been wanting to paint.

I started with the houses, trying my best to be patient and allow drying. That was hard for me. :o) I seemed to have a hard time with the sky, it was drying too fast!  So I kept re-wetting the area and dabbing in paint, and dabbing when I put in too much color. In the end, I like how it turned out. Looks like clouds. :o)  And that's how it is - we keep playing with something until we like it. Sometimes, we have to know when to stop! :o)

Here's a photo of my pallet - I'm so messy.


Thanks for visiting!

Take care and STAY POSITIVE!

Trena

Country Music Song


This week I'm working on creating a little scene with my "go to" stamps. 


You probably have your "go to" stamps also.  The stamps you use when you need a quick card - that occasion you just remembered, or your children you told you about. :o)  I just grab the Ai wooden fence, some grass,  and with any image and I can make a quick cute card.

First, I stamped and colored this poor tied up giraffe and the fence. The fence is so easy to color! Just give it a little shading and it's ready!  I used my Spectrum Noir markers to color - love them...such vibrant colors and fun to blend!


Next I cut out the fence and base card. I laid my fence at the bottom of the card and drew a pencil line to show where to cut. I down the seam and across.


All that was left was to stamp the clouds and grass on the blue sky. I adhered everything, stamped the perfect little sentiment to match his expression and it was ready! 


Thanks for visiting!
Take care and STAY POSITIVE!

Trena

Sunday, September 9, 2012

Teaching Around Town - September

Hope you can join me!

Thursday, September 6, 2012

Art Impressions Challenge - Use School/Office Supplies


This week's challenge is Use School/Office Supplies.  One of my favorite Art Impressions lines is the windows! They allow for a window view of anything.  I combined my stamps and stickers to make a little scene.  

I stamped the window image twice, colored it and cut around the outside of each one. Next I adhered the one image to the design and black layers and used a craft knife to cut out the window pains. I then adhered the window to the front of the base card and cut out the complete inside window. NOTE: I cut the four corners from the front and then lightly cut out the full window from the inside.  I closed the card and made pencil marks to show each corner of the window.  I cut the pains out of the second image and adhere it to the inside. I edged the inside of each window with a black marker.


On the inside I put in my stickers using the pencil marks as my guide.


List of Supplies Used: 
Stamps: Window - Front & Back #L1745
PaperGina K Memory Box DesignNeenah Solar WhiteStampin' Up! basic black
Ink/ColoringMemento Black ink pad,  Spectrum Noir Markers TN3, TN5, TN7, Marvy LePlume II marker black
Accessories: craft knife & mat, stickers

Please pop over to the Art Impressions challenge for this week to see a bunch of Use School/Office Supplies inspirational ideas!  You can enter for a chance to win a coupon!!

Thanks for visiting!

Take care and STAY POSITIVE!

Trena

Tuesday, September 4, 2012

Love You!


The new Strawberry Kisses Christmas sets are coming out this week and they are sooooooo cute!  Today I'm featuring the Love You set.  For coloring I chose Tombow Dual Brush Pens on watercolor paper.  I used a combination of direct [color on paper and spread color with a brush] and in-direct [scribble marker onto a non-stick surface and pick up color with a brush].

After I painted the adorable kitten, I cut him out. I used one of the new embossing folders to give my background some depth. I liked the combination of the circles and squares. I also popped his feet.  I'd like to be able to say this was a design feature of the card to give it dimension, but the truth is, this was the result of a "boo boo." :o)  I colored his feet darker than I wanted, so I covered them up with newly colored feet.


Stamps:  Strawberry Kisses
Paper: watercolor 140 lb. hot pressed, Memory Box DesignStampin' Up! green galore, Neenah Solar White
Ink/ColoringStazOn jet black in padTombow Dual Brush Pens
Accessories:  SticklesEmbossing Folder plaid template,  Watercolor Palette #WCPLT,  Watercolor Brush NO. 4 #WCBRUSH 4, black fine line marker

Thanks for visiting!

Take care and STAY POSITIVE!


Textured Furniture


It's Tuesday and my day to post at the Art Impressions Blog! This week I'm working on creating texture on furniture.


I colored my furniture first and allowed it to dry. Next I dipped my fabric into some alcohol - I used 91%.   I laid the fabric over the furniture and lightly pressed, one section at a time. The alcohol makes the color spread on the cardstock and take on the pattern of the fabric. NOTE: squeeze out most of the liquid so that the fabric is damp, not too wet.  The longer you lay it down, the more the color will spread. 


I finished coloring the whole scene and cut out the pieces.  I drew a base board, outlet and light switch on  the design paper. I added color with the markers.


List of Supplies Used: 
Coloring/Ink Copic Markers 0, B91,  C1, C3, C5, C7,  BG11, BG13, BG18, E000, E02, E17, E33, E35, G40, G82, R21, R24, Y13, YG05;  Memento Black ink pad,  Copic Markers multiliner 0.03
Accessories - fabric, alcohol

Thanks for visiting!

Take care and STAY POSITIVE!

Trena


Saturday, September 1, 2012

Crafter's Companion Sept Challenge - Stripes or Dots

For this month's Crafter's Companion Challenge  - Stripes or Dots, I chose to feature  A Present for You  set that was given away during Crafter's Companion's Birthday celebration.  


To color the image, I water colored with re-inkers. I added drops of color to a non-stick palette, wet one area at a time on the image and dropped in color.  The hardest part of this technique is patience. :o)  Allow the colors to dry in an area before adding more color to an area right next to it.  This paper took a looooooooooooooong time to dry with the inks. :o) The combination of paper and ink blend together nicely.   NOTE: I save my palette until I'm completely finished.  You can even save it and add water to the dried colors to reuse.  This paper is very forgiving. You can add water to "erase" or pull out color, even after it's dry.


You can do this technique with what ever re-inkers you have.  Try them on a variety of papers to see what combination of ink and paper/cardstock you like - learn the qualities of ink and paper together.  For any colors I don't have, I mix colors to get what I want, or add in a lot of water to create a subtle shade. If you are not getting the results you want, add a little more water or a little less water.  I keep little examples of different techniques I've tried, so I don't have to start over every time. If I go by my memory, I'm in trouble. LOL.

I found some A Muse design paper in my stash with stripes and dots. I used my Spectrum Noir Markers - CT3, TB9, and  LG3 to add more colors to match the image I colored.

List of Supplies Used: 
Stamps: Humphrey's Corner Collection - A Present for You
Paper:  Yupo white watercolor. A Muse,  Stampin' Up! green galore, Neenah Solar White
Inks/Coloring: StazOn jet black in pad, , Posh Impressions Rainbow InkSpectrum Noir Markers
Accessories: Watercolor Brush NO. 4 #WCBRUSH 4,


Thanks for visiting!

Take care and STAY POSITIVE!

Trena