Thursday, May 23, 2013

Art Impressions Challenge - Show Your Bow

This week's Art Impressions Blog challenge is Show Your Bow.  Maude (Sku#I1238) is showing her Style (Sku#D3469) - as only she can, in this design.


 I stamped the image onto Cryogen cardstock and colored with markers. I decided to make two cards at the same time - might as well color two images since I have the markers out.


For her stylish bows, I colored little pieces of twine with markers. The twine and all design papers/cardstock are from the GF Card Kit 2 (Sku#4303).  


On the inside of each card, I put a strip of design paper.


Please pop over to the Art Impressions challenge for this week to see a bunch of inspirational Show Your Bow ideas!  You can enter for a chance to win a coupon!!

Thanks for visiting!

Take care and STAY POSITIVE!

Tuesday, May 21, 2013

You Did It!!

This week I'm designing graduation cards. I'm featuring the newly released This is Huge Set (Sku#4288). 


 Isn't he adorable? And, he would make any graduate smile!  My experience has been that a grad's favorite  gift is money - that way they can pick out exactly what they want/need. :o)  This design will also work well for a gift card.  I colored him with Copic markers, I darkened his eyes and his smile with a multiliner and then cut out the image.


Next, I gathered my supplies and cut the base card to size. Based on my A2 size envelop, I cut the base card 6.5 x 5". I chose design paper and some ribbon from my stash to complement the little elephant.


I folded the base card and envelop in half and adhered one side of the envelop to the base card. For the second side, I put adhesive envelop side and folded the base card down on top.


I stamped a sentiment from the set on the inside.

Thanks for visiting!

Take care and STAY POSITIVE!

Friday, May 17, 2013

New Camden Town Release!

Crafter's Companion has just released the new Camden Town sets -  available right now!

Camden Town EZMount Stamp Set Bundle - Set of All 4 EZMount Stamp Sets

My design features images from the Male 1 set.


I stamped the images onto Ultra Smooth Premium White Cardstock for Alcohol Markers and colored them with my Spectrum Noir Markers. I used a combination of direct coloring to the cardstock and also pallet coloring - scribble color onto an acrylic block and pick up with a lighter color. As you lay the color on the cardstock, a natural blending occurs.  To see a video of palette blending, click here. 


After I colored, I cut a slit in the roof of the van to carry the beer. There's no way they would get in the back to take to the cook out. :o) I adhered it all down on the front of the card and wrote "woo hoo" on the itty big tag.  I used a punch to cut out the sentiment.


On the inside I added a strip of design paper and colored one more bottle.


Crafter's Companion has had several new releases. For more ideas, be sure to pop over to the Crafter's Companion Information Blog, as well as visit the Crafter's Companion DT members.  You see their latest designs by clicking on the names on the left side of my blog.

Thank you for visiting!!

Take care and STAY POSITIVE!

Tuesday, May 14, 2013

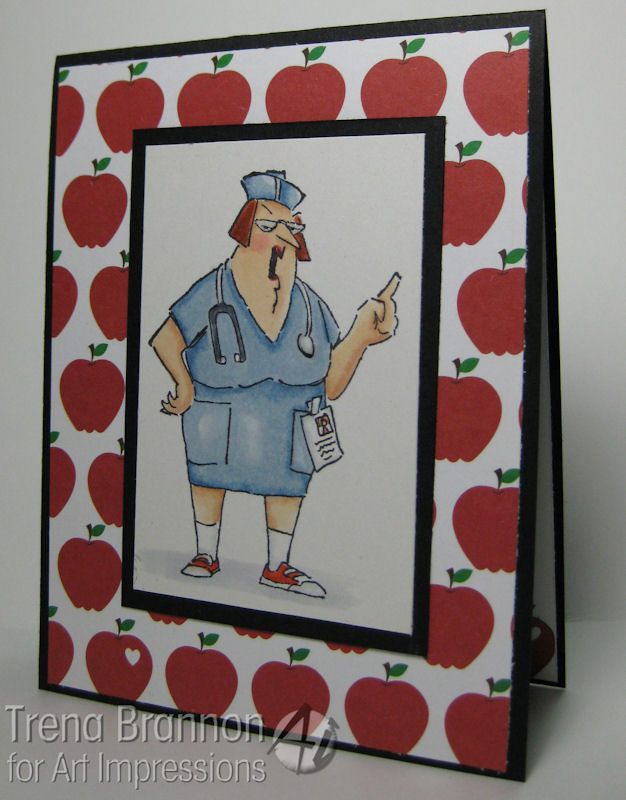
Nurse Norma says....

I'm working on a design for my children.


 They don't listen to me about eating healthy choices - perhaps they will listen to Nurse Norma (Sku#L4087). She has the look and attitude of authority - perhaps we all need to listen. :o)  I stamped her on Cryogen and colored with Copics. I also drew some detail on her little badge.


I chose the apple background because apples are associated with health - thinking (hoping) my children will make the connection and eat more apples than candy and french fries.   On the inside, I added a sentiment that I printed on my computer and an apple from the design paper.  The sentiment is something I tell children I know starting when there are little.


I added a couple final touches with glitter to her lips and denominational medium to her glasses and stethoscope.


Thanks for visiting!

Take care and STAY POSITIVE!

Friday, May 10, 2013

It's All About the Highlights


I'm stepping out of my comfort zone today with a little scene that has "no color."    


I started by stamping this lovely image from Sheena's A Little Bit Scenic - Provence onto Peddler's Den craft card stock.  Next, I added highlights and the lightest areas in the scene with a white pencil.  I then came back in with a black pencil and shaded the darkest lines/areas. 


Sheena has all the detail in the image which makes identifying the light and dark areas quite easy.  What a simple method, yet striking effect against the craft cardstock!  Try it!! It's very easy!  I learned this fun technique from my stampin' sister Tonya, owner of Peddler's Den.  We were together a couple weeks ago at the 2013 Stampscapes Yahoo Group Stamping Retreat.


Crafter's Companion has had several new releases. For more ideas, be sure to pop over to the Crafter's Companion Information Blog, as well as visit the Crafter's Companion DT members.  You see their latest designs by clicking on the names on the left side of my blog.

Thank you for visiting!!

Take care and STAY POSITIVE!


Thursday, May 9, 2013

Art Impressions Challenge - "Theory of Negativity"

This week's Art Impressions Blog challenge is "Theory of Negativity." 


 Ai is asking you to turn your negative pieces into positive artwork! Their "Theory of Negativity" (very scientific ☺) is defined as using the negative space from die cuts or punches. Take the remnants from your 'empty' shapes and add them to your creations or use the pieces as stencils for a new project! Each project needs to have an empty piece shown on the project or a picture of how you used the negative space. 

For my interpretation of the challenge, I started with the base card. I cut the cardstock for an A2 size base and drew a pencil line to mark the fold. Next, I used a die cut to randomly cut out stars in the sky.


I masked off a horizon line,  and also at the edge that marked my fold line. I airbrushed in a rich nighttime blue sky. I moved the mask above the horizon line and airbrushed in the grass.


 I stamped the cottage from the Cottage TF (Sku#4202) set, masked it and stamped more trees on each side. TIP: I used a stamp postioner to place the extra trees just where I wanted.


 I added some blades of grass with Teeny Tiny Grass (Sku#AAA1374).  I added random white dots with a gel pen to create many more stars way off in the distance. Some of them smeared a little - those are the shooting stars. :o) hehehe. I colored in the little cottage, cut it out, trimmed the edge with a black marker and adhered it over the background.   I stamped the little cute sentiment from the set and also edged it with a black marker.


On the inside added another image from the set. NOTE: I stamped it off twice to make it subtle.


Please pop over to the Art Impressions challenge for this week to see a bunch of inspirational  "Theory of Negativity" ideas!  You can enter for a chance to win a coupon!!

Thanks for visiting!

Take care and STAY POSITIVE!

Tuesday, May 7, 2013

At the Circus


Hello Ai Fans! 

This week I'm still hanging out with Girlfriends.


With the warmer weather, there's just so many opportunities to be outside, and Girlfriends are taking advantage of it. This week, the girls are at the circus - enjoying the attractions and each other.  I'm featuring images from the Girlfriend Blend Set (Sku#4132) and colored with Copic markers. After coloring the girls, I cut them out and used a black water based marker around the edge.


I placed them on top of a fun background and added some bling to their jewelry and lips with glitter pens.


On the inside I added matching design paper and stamped a sentiment from the set.


Come back tomorrow to see what lovely project Crystal has to share!

Thanks for visiting!

Take care and STAY POSITIVE!

Friday, May 3, 2013

Pinspired - Crafter's Companion Joint Blog Hop


Welcome to the Pinspired - Crafter's Companion Joint Blog Hop!

Just in case you are new to either Pinspired or Crafter's Companion, let me tell you a little bit about them both:


Crafter's Companion
Crafter’s Companion is a U.K.-based company with offices in Anaheim, CA and Northern England. Well known for our innovative paper crafting tools and accessories, our products are distributed and sold worldwide. Our most popular products include Spectrum Noir Alcohol Markers, the Ultimate Crafter’s Companion Tool, the Ultimate Pen Storage, embossing folders, and EZMagnetic Storage panels for metal embossing and cutting dies. Our staff prides itself on top-notch service with a 100% customer satisfaction philosophy. If we havve exceeded your expectations, then we’ve done our job!

Pinspired Challenge Blog
Pinspired Challenges was created by a group of girls that LOVE Pinterest and crafting.... We came up with the idea of the challenge in the latter part of 2012 and the challenges launched in January of 2013. Our DT, or as we like to call them, "Pin Heads" have scoured Pinterest to bring you some amazing inspirational pins. We will post a brand new challenge on the 2nd and 4th Tuesday of every month. You will have until Thursday of the following week to link your entry onto the challenge post. That's 9 whole days to play along!!!! Inspirational photos are for you to interpret anyway you want. You can take from the colors, the style or the technique - whatever floats your boat! You can also feel free to make any kind of craft you want as well, whether its a card, layout or altered item.

From May 3 - 5, we are showcasing Crafter's Companion stamps from Sheena's A Little Bit Floral collection.


You have TWO chances to win! You can hop around and comment on all of the blogs for one chance to win a gift certificate from Crafter's Companion
 (May 3 - 5, 2013).

For a second chance to win, you can play along!


 Use the image above to create a project and post it using InLinkz on the Pinspired Blog.
 You have until May 9, 2013 to participate for a chance to win a gift certificate from Crafter's Companion. If you create and comment on the Blog Hop, that is two chances to win!

Here is the full Hop List:
Annette

Audrey
Trena (me :o)


*********The InLinkz to play along is on the Pinspired Blog**********

We are hopping today with inspiration and creativity!!

Now, to share what I made with Sheena's flowers!!


I featured Sheena's lovely Iris:

Sheena's A Little Bit Floral EZMount Stamp Set - Iris

I enjoy scenic stamping - putting together a variety of images to create a whole scene. When you start with Sheena's images, you only need three stamps to create a stunning scene. :o)  The iris is backed up with images from her just as lovely Lakeside Shore set

I started by stamping the image closest to the front - the iris, onto semi-glossy cardstock.  I masked it with a low tack tape and stamped the land and tree branches in the corner. The detail of Sheena's images look so pretty on glossy!


 I used a stylus to add color.


After adding the base color, I darkened some areas and blended others using a pointed blending tool.


Now, remember to leave a comment and hop around!!:o)

Thanks for visiting!

Take care and STAY POSITIVE!