Saturday, June 30, 2012

Three Things...


ThingOne:  Please be sure to visit the Crafter's Companion blog today where you will see the names of the new Design Team members!! We're all excited about it!!

ThingTwo:  Dawn is sharing an awesome Giveaway today. Please visit her blog post: http://www.dawnscraft.com/2012/06/come-one-come-all-to-on-line-cha-event.html

ThingThree: Taylor is sharing a cool idea book and fun filled Blog Hop. Please visit her blog post: http://taylorusry.blogspot.com/2012/06/steampunk-idea-book.html

Can you tell I'm a Dr. Seuss fan?! :o)

Thanks for visiting!

Take care and STAY POSITIVE!  

Trena

Thursday, June 28, 2012

AI Challenge - Gift Card Holder


This weeks AI challenge is Gift Card Holders.   I chose this adorable Snowman Keeper to feature.   The Card Keepers come with directions and ideas on how to put the images together.   I made it A2 size so that it fits nicely in an envelop to mail.

First, I inked up the image with a VersaFine ink pad, stamped onto 140lb cold press watercolor paper, sprinkled black embossing powder and heat set. I used my Tombow Dual Brush Pens to color. Scroll down to see projects I've done with details on in-direct and direct coloring with Tombows.  Such an easy and fun way to add color!!  The design paper is from Scrapworks Designs.

Here's a photo of what it looks like before the gift card is slid in.  I used a craft knife to cut slits on either side of the bow and the corner of the Christmas tree so the gift card can slide right in.


Tombow colors used:
N55, N95
062, 993
158, 177, 192
847, 873, 856
947, 977

Please pop over to the challenge for this week to see a bunch of gift card holder ideas!


Thanks for visiting!

Take care and STAY POSITIVE!  
Trena

Tuesday, June 26, 2012

Highlighting Kanji


This week I'm highlighting the Kanji Collection EZMount Stamp Set - Set 4.

I stamped the background image onto Cryogen card stock with a Memento ink pad and colored the leaves and flowers with my Spectrum Noir Markers.    I stamped the fan image on a piece of scrap Cryogen, colored it and cut it out.  For coloring the leaves, I scribbled the darker green onto an acrylic block. I picked up color with the lighter green marker and spread the color.  This produces a lovely blending of the two greens.


Here are the colors I used:


Thanks for visiting!

Take care and STAY POSITIVE!  
Trena

Coming In For a Landing


I just love this little neighborhood!  The houses are so cute and well kept - it's called WC BirdhousesWC Blue Bird Left is coming in for a landing.   

I stamped the images on Xpress card stock and colored with my Copic Markers. For the subtle sky background, I scribbled B34 onto a non-stick surface, spritzed with alcohol and picked up color with a paintbrush.  I used a short horizontal stroke back and forth on the card stock. I had to add alcohol often to get the flow I wanted.


The colors I used are: 

0, B34, B91, B95, C1, C3, C5, E08, E09, E31, E35, E70, E71, G40, G43, Y11, Y13
 
Take care and STAY POSITIVE!
Trena

Saturday, June 23, 2012

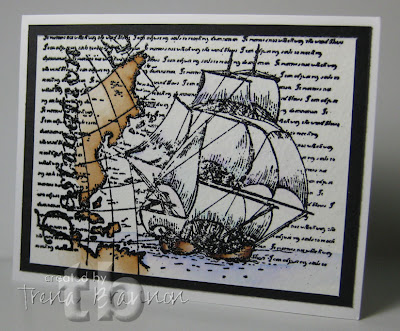
Sailing with Watercolor


Today I'm sharing an easy watercolor technique.   I really dig Sheena's Destination sail boat image for a graduation card.   In my area, graduation open houses are still going on. :o)  It is so wonderful to see the young people I've watched grow up making the next step in their lives. Just the conversation is awesome! I think this card would work for high school, college - even post grad celebrations.

First, I inked up the image with a VersaFine ink pad, stamped onto 140lb cold press watercolor paper, sprinkled black embossing powder and heat set.


Next, it's time for coloring!  I used Tombow Dual Brush Pens, which are water based markers. I used them  in two ways - direct [color directly on the paper and then spread color with a water brush]and indirect [scribble color onto a non-stick surface, pick up color with water brush]. With both, I start a new color with a clean damp (not dripping) brush tip.   I colored the boat and sails direct. When I used my water brush, I started in the white, or lightest, area and spread into the dark.


I colored the water and land using the in-direct method for a more subtle effect.  When using in-direct method, I pick up color off the pallet and start where I want my darkest color to be (as with traditional water coloring).  I usually wet the area will clear water first, then add color.


After it all dried, I checked to see if I had any hard edges on my color. If I did, I added clear water around the edge to smooth out the color.

To see a similar result using Spectrum Noir Markers, you can see a card I did here.

Thanks for visiting!

Take care and STAY POSITIVE!  
Trena

Thursday, June 21, 2012

Giggles - Make us laugh!


The Art Impressions challenge theme this week is: Giggles - Make us laugh!   It was easy to find an image since so many of AI's images do make me giggle. Do you know anyone like this? Is this you? :o) I know I have my 'opinion moments.'  All the stamps [Art Impressions Birdie & Eggnus, Door Ways Sewing Shop, Everything I Say] are from Art Impressions.  The attitude of this hen image is just so funny to me. :o) She could be saying many, many things. This base card is 5 1/4" square.
 
I Inked  up hen image with Memento and stamped onto Gina K card stock. Inked up mitten and stamped on scrap piece of card stock. Colored images with Copic Markers, blending two or more markers from the same color family into an area. Colored the second mitten image and cut out.  Adhered cut out mitten on top of complete image.  For the two pieces of design card stock, I overlapped the bottom to the top about 1/2" and adhered them together, then cut to the layer size I wanted.  I wrapped the ribbon around the area where the two pieces over lapped.
I inked up sewing basket with StazOn and stamped onto shell, Favorite Findings Shellz Buttons- 3/4'' Round River Dangles. Allow to dry. TIP:  lay stamp face up on the table and bring the shell to the stamp.  I used Sharpie markers to add color to the sewing basket.  The design paper is from Club Scrap.

Please pop over to the challenge for this week to see a bunch of cards that make you giggle. :o)

Take care and STAY POSITIVE!
Trena

Tuesday, June 19, 2012

Watercolor through a Window


I had so much fun water coloring Monique last week, I decided to continue with watercolor this week!  This card features window back and garden window.  The card measures 4.25" square. The design papers are from BasicGrey. I used a Cuttlebug folder to get those dots on the front of the card.  I added a little  bling with a Sakura glitter pen.

I stamped each image with a VersaFine onyx black ink pad onto 140lb hot press watercolor paper, sprinkled with black detail emboss powder and heat set.

As with Monique, I used a combination of direct and in-direct methods of adding coloring with Tombow Dual Brush Pens.  In-direct = scribble color on pallet, pick up color with water brush and spread. Direct = color directly onto paper and then spread with water brush.  TIP: If you are ever at a loss for what colors to use on your image, go to Art Impressions and bring up the image. Almost all the images have color  at the site.  There are also many, many, many....many cards and projects using Art Impressions images at Pinterst. A great source for inspiration!


Another TIP:  When I cut out images, I use a black marker to darker the edges. I just run the marker along the inside and of where I cut.  I stamped a partial image on the inside and colored with markers.  I used my computer to print out the sentiment.


Hope you are making today an awesome day!!
Take care and STAY POSITIVE!
Trena

Wax Wine


Sharing another card with wax - wine wax. :o)

Stamped wine, glass and grapes image onto glossy paper - this is for the pieces I cut out.   Stamped several wine glass images randomly onto large piece of glossy paper - this is for the background. Added wax to both using an iron. I also melted a little metallic crayon in with the wax  - the metallic adds an interesting texture.

I stamped the wine bottle image onto Ultra Smooth Premium White Cardstock for Alcohol Markers. This is for my base image. I used my Spectrum Noir Markers to color. Colored base image sections that I was not planning to cover with the paper pieces. 


Next I cut out the pieces of the wax image - wine bottle, wine in glass and grapes and adhere those onto the base image. TIP: when using the paper piecing technique, I use a liquid adhesive to adhere pieces - the liquid gives you a little more time to shimmy your piece into place.  Also, many times I will add a little color to the base card where I place my pieces. That way if my cutting was not precise, it will not be obvious with a big white space. :o)

For a little added extra touch, I used a white pen to add highlights.  I used the IG2 marker to draw a subtle outline around the complete image.

To lean more about Encaustic Painting, you can visit Encaustic Creations

Thanks for visiting!
Take care and STAY POSITIVE!
Trena

Thursday, June 14, 2012

dad


The Art Impressions challenge theme this week is Husband/Father.   When I saw the theme, I knew which image I would use. :o) This man looks so comfortable  This image is called Lazy Boy.  He has had his snack, watched (may be still on) his favorite show or sporting event and is knocked out.

I used Copic Markers to color him and DCWV design papers for the background.  The letters are punch outs from Club Scrap. I dabbed a black soot distress ink pad on them.


Please visit the Art Impressions Blog for more ideas and inspiration and to participate in the challenge!


Thanks for visiting!
Take care and STAY POSITIVE!
Trena

Tuesday, June 12, 2012

Lovely Watercolored Tree


Today, I am sharing a simple water color technique using the newly released beech tree from the Art-Kure Timeless Britain Collection.

For the background, I scribbled markers onto a non-stick surface, spritzed water and ran a piece of 140lb hot pressed watercolor paper through the color. I used my finger to spread color across.   I created a couple backgrounds while I had my supplies out.


Next, I colored the image direct with the markers using two greens and running a brown marker up the center and over a few of the branches.  I spritzed the tree with water and stamped onto the background I created.   I then stippled the green areas with a wide water brush.


Without cleaning the stamp, I spritzed one time and stamped onto the right side of a piece of white card stock.  I repeated on the left side of the card stock. 


For the inside of the card, I stamped tree tops at the bottom.


This design was inspired by:
http://www.youtube.com/watch?v=VMl9XH_iy7o

Take care and STAY POSITIVE!
Trena

Wine For Two


It's my day over at the Art Impressions Blog to share and I'm sharing a design with  Monique! Isn't she delightful!? You can just tell she enjoys her work. Here she has a lovely tray of wine, bread and cheese for two.

I'm using one of my favorite techniques today, watercolor with Tombow Brush Art Markers. I inked up the image with a VeraFine ink pad, stamped onto 140 lb hot pressed water color paper, sprinkled with black detail embossing powder and heat set.

I used a combination of direct and in-direct methods of adding coloring with Tombows.  In-direct = scribble color on pallet, pick up color with water brush and spread. Direct = color directly onto paper and then spread with water brush.


I stamped, embossed, and colored the tray and glasses a second time, cut them out and adhered them over the base image. On the inside of the card, I added a strip of the design paper, stamped the little wine basket and colored it in directly with Tombows.   For a little added touch, I added Drew Drops and used a Sakura clear glaze pen on the glasses and wine bottles inside and out.


Thanks for visiting!
Take care and STAY POSITIVE!
Trena

Monday, June 11, 2012

Underwater Wax

Sharing a little scene I did with a wax background.  Click on the photo to see details of how I made this little scene.


Take care and STAY POSITIVE!
Trena

Saturday, June 9, 2012

Wax Art Work


Encaustic-TLB1b-spc

Encaustic-TLB2b-spc


Encaustic-TLB3b--spc

Encaustic-TLB4a-spc

To see more information on these Encaustic art pieces I did, please visit Stamping, Painting and Giggling to see all the details.
Take care and STAY POSITIVE!
Trena

Thursday, June 7, 2012

Pass Me My Jeans


For this week's Art Impressions Challenge, the DT is coming up with ideas for the theme: Fitness/Workout/Dieting.  This corset birdie took a little shortcut to dieting to make sure she could fit into her jeans. LOL!  I printed the little sentiment on my computer.  This card measures 5.25" square.

I stamped onto Cryogen white card stock  with a Memento tuxedo black ink pad and used paper piercing to match her corset to the background design papers (BasicGrey).  I use a liquid adhesive when I do the paper piercing technique. It allows for more time to shimmy your piece into place.  I used my Spectrum Noir Markers to add color. 


Many times when I'm creating a card, I will make two while I have all the supplies out. I added a strip of design paper to the inside of the cards.


Please visit the Art Impressions Blog for more ideas and inspiration!

Thanks for visiting!
 
Take care and STAY POSITIVE!
Trena
Tuesday, June 5, 2012

Precious Birthday Bear


This card is for a baby's 1st Birthday and features Christine Haworth Meadow Cottage Bears Happy Birthday image. I  wanted to have a white teddy bear. I stamped onto Ultra Smooth Premium White Cardstock for Alcohol Markers and used my Spectrum Noir Markers to color. The IG1is a nice light shade to give the cute little bears some shape. The nice thing about these designs is that the artist drew in shading in for us.  When I'm not sure where to color the shading, I look at the packaging as a guide. :o) The design paper is from BasicGrey.  I put a stripe inside the card.


Here are all the colors I used:

 
Take care and STAY POSITIVE!
Trena

Front and Back Tutorial


Last week I said I would use the fence this week with Front & Back images, and so I did! :o)  Last year I had the awesome opportunity to attend a Front & Back class with Bonnie and Kendra! I got lots of great tips on how to use the images.

This is Becky. Isn't she just a cutie pie! Further down I included photos of more cards with Front & Backs I've done.

I stamped Becky onto Cryogen card stock with a Memento black ink pad.   I stamped the fence two times. I colored with Copic Markers first and then cut out all the images.

Next, I planned my placement.  I laid the fence on the front of the card and cut the front of the base card right at the top the fence.  I trimmed the little piece to the right of the fence. I also trimmed the back of the base card.  I don't think the relative that I send this card to will notice that it's slightly smaller than an A2 size greeting card. :o)


I added a smokey blue piece of card stock to the inside (which is also the outside) and stamped the WC limb several times in the corner as if there's a tree over Becky's shoulder.  I used the small grass clump to add some grass under the fence outside and inside.   I adhered the front and back of Becky's head together. NOTE: be sure to trim right up to the line and they will match perfectly.


For final placement. I adhered Becky to the fence checking for placement on the inside and out before pressing down.

 Below are some more cards I made with Front & Back images.


 Fanny, Lie About Your Age

 Ben, flower potleavesteeny tiny grasssmall grass clump,
I typed the sentiment on my computer.


Thanks for visiting!!

Take care and STAY POSITIVE!

 Trena