Friday, May 31, 2013

Bookmarks Anyone?

I still have a few friends that have not converted to e-readers.  They like the feel a real book - the cover and to physically turn pages.  Today, I'm making bookmarks for them.


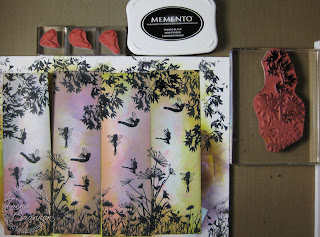
I laid down color using using a blending tool and distress inks. I did this on top of a piece of cardstock (Ultra Smooth Premium White Cardstock for Alcohol Markers) - to catch all the color. I've used it under coloring a few times, and will use that for a background piece later. I learned that from Dina (thank you mama dini!). Depending on how smooth you want the blending, you need to use a very light touch. You can see in some of my coloring, I was a bit heavy handed. By the time I got the stamping in, it wasn't as noticeable.


Next, I lined bookmarks up touching and stamped flowers from Sheena's A Little Bit Scenic - Silhouette Grasses across the bottom.


I stamped in a taller flower from the set off the edges.


With the bookmarks still lined up closely, I stamped the tiny fairies from Sheena's A Little Bit Scenic - Hidden Fairies and tree branches from Sheena's A Little Bit Scenic - Silhouette Garden.


For an added touch of detail, I added Stickles to their wings, dabbed it randomly, and added white acrylic paint on the tips of some of the flowers.


After everything dried completely, I added color to the backs using the distress ink pads directly and stamped one of the mini fairies. 


 On the front, I added black to edges and stamped few more tree leaves.


I slipped them into their clear sleeves and added some ribbon and fibers from my stash. TIPS: I used a ruler to help guide the paper into the sleeves.  I use dental floss to help pull the ribbon through the little hole. I used twine to tie the ribbon, so I would not have a fat knot.


I looked at my catch all piece of cardstock and wanted to make something with the background -I didn't know what yet. Here's what it looked like to begin with. :o)


I cut it into A2 size pieces and used blending tool and distress inks to fill in the white edges of one of the pieces. Then I got an idea! Next I stamped branches in green from Sheena's A Little Bit Scenic - Silhouette Garden. Next, I used an emboss folder provide the tree base for the leaves.


I used a paintbrush to apply distress ink to the tree trunks and leaves from the emboss folder, stamped more leaves with a variety of greens and blues, and trimmed the little scene.  I layered it on another emboss folder design (both emboss folders are  4.25 x 5.75" by Darcie).  Here's the completed card:


Crafter's Companion has had several new releases. For more ideas, be sure to pop over to the Crafter's Companion Information Blog, as well as visit the Crafter's Companion DT members.  You see their latest designs by clicking on the names on the left side of my blog.

Thank you for visiting!!

Take care and STAY POSITIVE!

Tuesday, May 28, 2013

Comfy With My Girlfriends

This week I'm hanging out with Girlfriends!  They are having an old fashioned sleep over - staying up late, popcorn, and of course, lots of laughing.


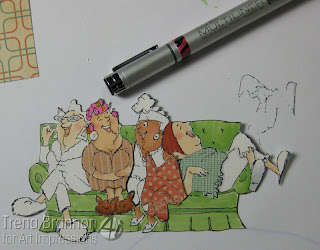
 I stamped the Comfy on Couch Set (Sku#4050)  main image onto Cryogen cardstock and colored all the girl's skin with markers. I stamped the same image on a variety of design papers from GF Card Kit 2 (Sku#4303).


I cut out pieces for their clothing and adhered with liquid glue. TIPS: If you find a piece is not fitting just right next to another piece, trim it closer and use a black pen or mulitiliner to thicken the black line. That way any white space will be covered.  To add some variation in color, use the markers to color over areas of the design paper. To get glue in small areas, use a tool pick.


This perfect sentiment comes with the set.


Below is a photo of all the colors I used: 


Come back tomorrow to see what lovely project Crystal has to share!

Thanks for visiting!

Take care and STAY POSITIVE!

Friday, May 24, 2013

New Sheena Release!

For my design today, I'm featuring images from the new Sheena Floral Fantasy release which will be available tomorrow at Crafter's Companion! 


This lovely flower and leaves are in the Wild Rose & Hibiscus set.

I stamped the images onto Ultra Smooth Premium White Cardstock for Alcohol Markers  I used my Spectrum Noir ink refills to paint in color.

Working on one pedal at a time, I painted with PP1 first. I painted in the direction of the pedal. TIP: for color inspiration, google images for what you are coloring. Look at several different images to give you a color guide.


Next I came in with FL1. Similar to watercolor painting, I dipped my brush in alcohol as needed to smooth - being careful not saturate the brush. If (ok, when) I colored colored outside the line, I used the Blender pen to push color, or lighten the color, in areas - just like when using the markers.


After I finished the first round, I went back into the shaded areas with FL1. Just as with the markers, I used my lightest color PP1, to blend where the colors met.


I used the same method of coloring the leaves with  DG1 and DG2.  Next, I cut out the images. 


NOTES: Work in a well ventilated area when working with the alcohol, as the scent can be strong at times. The alcohol inks will dry relatively fast, so I recommend no baking cookies, mowing the lawn or talking to telemarketers while doing this technique. :o)  If the ink does dry out, dip your brush in alcohol and add to the ink. For clean up, I used alcohol to wipe down the pallet and swirled the brush in it.

Shout out: My design today was inspired by my DT sister Kendra. She created a beautiful card with Sheena's new violets. You can see Kendra's lovely card here.

Crafter's Companion has had several new releases. For more ideas, be sure to pop over to the Crafter's Companion Information Blog, as well as visit the Crafter's Companion DT members.  You can see their latest designs by clicking on the names on the left side of my blog.

Thank you for visiting!!

Take care and STAY POSITIVE!

Thursday, May 23, 2013

Art Impressions Challenge - Show Your Bow

This week's Art Impressions Blog challenge is Show Your Bow.  Maude (Sku#I1238) is showing her Style (Sku#D3469) - as only she can, in this design.


 I stamped the image onto Cryogen cardstock and colored with markers. I decided to make two cards at the same time - might as well color two images since I have the markers out.


For her stylish bows, I colored little pieces of twine with markers. The twine and all design papers/cardstock are from the GF Card Kit 2 (Sku#4303).  


On the inside of each card, I put a strip of design paper.


Please pop over to the Art Impressions challenge for this week to see a bunch of inspirational Show Your Bow ideas!  You can enter for a chance to win a coupon!!

Thanks for visiting!

Take care and STAY POSITIVE!

Tuesday, May 21, 2013

You Did It!!

This week I'm designing graduation cards. I'm featuring the newly released This is Huge Set (Sku#4288)


 Isn't he adorable? And, he would make any graduate smile!  My experience has been that a grad's favorite  gift is money - that way they can pick out exactly what they want/need. :o)  This design will also work well for a gift card.  I colored him with Copic markers, I darkened his eyes and his smile with a multiliner and then cut out the image.


Next, I gathered my supplies and cut the base card to size. Based on my A2 size envelop, I cut the base card 6.5 x 5". I chose design paper and some ribbon from my stash to complement the little elephant.


I folded the base card and envelop in half and adhered one side of the envelop to the base card. For the second side, I put adhesive envelop side and folded the base card down on top.


I stamped a sentiment from the set on the inside.

Thanks for visiting!

Take care and STAY POSITIVE!

Friday, May 17, 2013

New Camden Town Release!

Crafter's Companion has just released the new Camden Town sets -  available right now!

Camden Town EZMount Stamp Set Bundle - Set of All 4 EZMount Stamp Sets

My design features images from the Male 1 set.


I stamped the images onto Ultra Smooth Premium White Cardstock for Alcohol Markers and colored them with my Spectrum Noir Markers. I used a combination of direct coloring to the cardstock and also pallet coloring - scribble color onto an acrylic block and pick up with a lighter color. As you lay the color on the cardstock, a natural blending occurs.  To see a video of palette blending, click here


After I colored, I cut a slit in the roof of the van to carry the beer. There's no way they would get in the back to take to the cook out. :o) I adhered it all down on the front of the card and wrote "woo hoo" on the itty big tag.  I used a punch to cut out the sentiment.


On the inside I added a strip of design paper and colored one more bottle.


Crafter's Companion has had several new releases. For more ideas, be sure to pop over to the Crafter's Companion Information Blog, as well as visit the Crafter's Companion DT members.  You see their latest designs by clicking on the names on the left side of my blog.

Thank you for visiting!!

Take care and STAY POSITIVE!

Tuesday, May 14, 2013

Nurse Norma says....

I'm working on a design for my children.


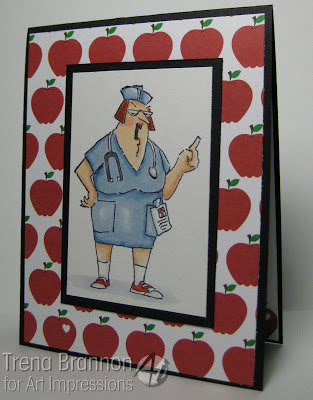
 They don't listen to me about eating healthy choices - perhaps they will listen to Nurse Norma (Sku#L4087). She has the look and attitude of authority - perhaps we all need to listen. :o)  I stamped her on Cryogen and colored with Copics. I also drew some detail on her little badge.


I chose the apple background because apples are associated with health - thinking (hoping) my children will make the connection and eat more apples than candy and french fries.   On the inside, I added a sentiment that I printed on my computer and an apple from the design paper.  The sentiment is something I tell children I know starting when there are little.


I added a couple final touches with glitter to her lips and denominational medium to her glasses and stethoscope.


Thanks for visiting!

Take care and STAY POSITIVE!

Friday, May 10, 2013

It's All About the Highlights


I'm stepping out of my comfort zone today with a little scene that has "no color."    


I started by stamping this lovely image from Sheena's A Little Bit Scenic - Provence onto Peddler's Den craft card stock.  Next, I added highlights and the lightest areas in the scene with a white pencil.  I then came back in with a black pencil and shaded the darkest lines/areas. 


Sheena has all the detail in the image which makes identifying the light and dark areas quite easy.  What a simple method, yet striking effect against the craft cardstock!  Try it!! It's very easy!  I learned this fun technique from my stampin' sister Tonya, owner of Peddler's Den.  We were together a couple weeks ago at the 2013 Stampscapes Yahoo Group Stamping Retreat.


Crafter's Companion has had several new releases. For more ideas, be sure to pop over to the Crafter's Companion Information Blog, as well as visit the Crafter's Companion DT members.  You see their latest designs by clicking on the names on the left side of my blog.

Thank you for visiting!!

Take care and STAY POSITIVE!