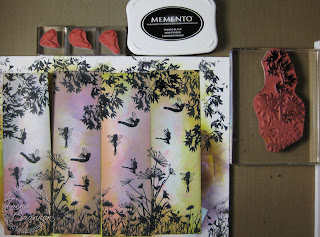
I still have a few friends that have not converted to e-readers. They like the feel a real book - the cover and to physically turn pages. Today, I'm making bookmarks for them.
I laid down color using using a blending tool and distress inks. I did this on top of a piece of cardstock (Ultra Smooth Premium White Cardstock for Alcohol Markers) - to catch all the color. I've used it under coloring a few times, and will use that for a background piece later. I learned that from Dina (thank you mama dini!). Depending on how smooth you want the blending, you need to use a very light touch. You can see in some of my coloring, I was a bit heavy handed. By the time I got the stamping in, it wasn't as noticeable.
Next, I lined bookmarks up touching and stamped flowers from Sheena's A Little Bit Scenic - Silhouette Grasses across the bottom.
I stamped in a taller flower from the set off the edges.
With the bookmarks still lined up closely, I stamped the tiny fairies from Sheena's A Little Bit Scenic - Hidden Fairies and tree branches from Sheena's A Little Bit Scenic - Silhouette Garden.
For an added touch of detail, I added Stickles to their wings, dabbed it randomly, and added white acrylic paint on the tips of some of the flowers.
After everything dried completely, I added color to the backs using the distress ink pads directly and stamped one of the mini fairies.
On the front, I added black to edges and stamped few more tree leaves.
I looked at my catch all piece of cardstock and wanted to make something with the background -I didn't know what yet. Here's what it looked like to begin with. :o)
I cut it into A2 size pieces and used blending tool and distress inks to fill in the white edges of one of the pieces. Then I got an idea! Next I stamped branches in green from Sheena's A Little Bit Scenic - Silhouette Garden. Next, I used an emboss folder provide the tree base for the leaves.
I used a paintbrush to apply distress ink to the tree trunks and leaves from the emboss folder, stamped more leaves with a variety of greens and blues, and trimmed the little scene. I layered it on another emboss folder design (both emboss folders are 4.25 x 5.75" by Darcie). Here's the completed card:
Crafter's Companion has had several new releases. For more ideas, be sure to pop over to the Crafter's Companion Information Blog, as well as visit the Crafter's Companion DT members. You see their latest designs by clicking on the names on the left side of my blog.
Thank you for visiting!!
Take care and STAY POSITIVE!


WOW....that's all I can say...AMAZING!!!!!!!!!!!!!!!!
ReplyDeleteSteph
scrappyrae10.blogspot.com
OH WOW!These are AWESOME!!!Thank for the tutorial!!!
ReplyDeleteThose are just gorgeous. I always love the work you do Trena.
ReplyDeleteTrena its been a while since I visited your blog. And every time I come back I'm always amazed at your work. Its always beautiful and it all ways inspire me to give it a try. I so wished you did youtube videos of some of your work. You are truly amazing girl. HUGS AJ-
ReplyDelete