I used a few different coloring techniques to create these fun designs.

To prepare the dominoes, I soaked them in bleach overnight. This step allows the ink to better adhere to the surface. It does dull down the domino a bit. This is good for a vintage look. If you want that sheen, you can add it back later - which is what I did on most of these designs. All of these designs feature images from the Stamp It line at Crafter's Companion.
For the first coloring technique, I picked up color from StazOn ink pads with felt pieces and applied color to the domino. I used one color at a time. I started with the sides and then the front leaving a highlight. I also added color to the back.

Next I stamped the Statue of Liberty image from the Stamp-It Australia EZMount Stamp Set 69 - Around The World. I placed the image face side up and brought the domino down to it. I find this is easier to capture the exact part of the image I want onto the surface. With this technique, you do not need to add a finish.


The second coloring technique uses Spectrum Noir Markers. I stamped the image first - face side up, as above. This image is from the Stamp-It Australia EZMount Stamp Set 70 - Lucious Landscapes.

Next I added a layer of clear medium. Before adding color with the alcohol inks, you need to put some type of finish/sealer on top of the solvent ink. They do not play well together. :o) After it dried completely, I used a combination of direct (coloring directly with marker) and indirect coloring (scribbled onto a non-stick palette and picked up color with a paint brush dipped in alcohol) to "paint" the little scene. TIPS: Be sure to let a color dry before coloring next to it. Use clean alcohol to clean your brush between colors and to add texture, such a clouds or water waves. Be to be careful not to use too much alcohol, it makes the color spread beyond where you want to end. If that does happen, no worries - this is a very forgiving technique. :o) Wait until it dries, then go back over with the color you want to correct it.
I allowed the domino to dry and then added a thin layer of clear medium to seal in the colors. Spectrum Noir Colors used: BT4, CG3, DG3, EB3, GB7, TB3.

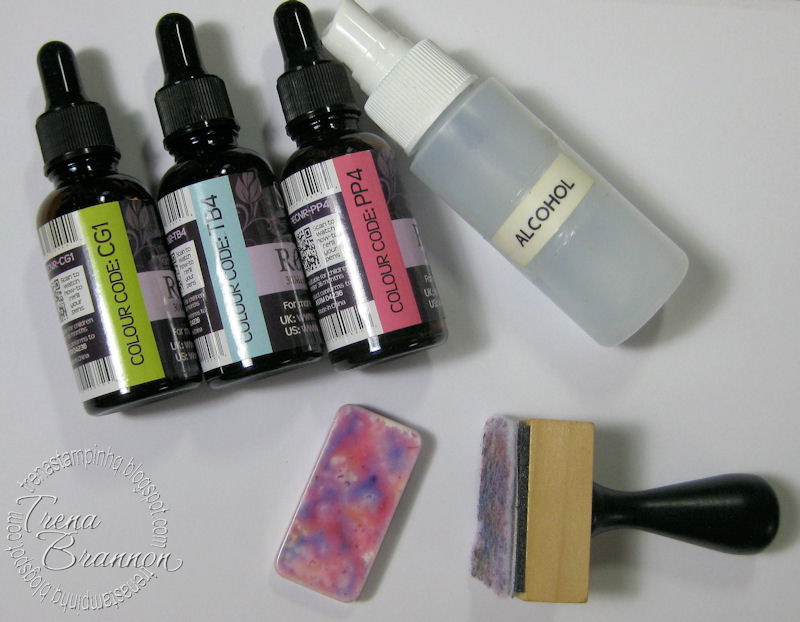
For the third coloring technique, I dropped Spectrum Noir ink onto an Alcohol Ink Applicator, spritzed the applicator with alcohol and tapped color onto the domino. NOTE: The dropper tops of the ink refills work great for this technique! I tapped until I was happy with the colors. I have to admit, this one was the most fun! That's why I made so many. :o)
domino 1: CG1, TB4, PP4
domino 2: clean felt FS5, HB2, PP4

domino 3: did not change felt, added CG3, TB4, TB5. Spritzed more alcohol onto felt and tapped again to spread color.

domino 4: did not change felt, after tapping, spritzed domino with alcohol

domino 5: did not change felt, spritzed domino with alcohol then tapped

I allowed each domino to dry and added a thin layer of clear medium before stamping. After stamping, I allowed each domino to dry and added a thin layer of clear medium to seal everything.
I used images from: Stamp-It Australia EZMount Stamp Set Spring - Dreamy Daisies (colored with CT4, DG4), Stamp-It Australia EZMount Stamp Set 62 - Time To Dream, Stamp-It Australia EZMount Stamp Set 24 - Oriental Delights

NOTE: Be sure to work in a well ventilated area as the alcohol scent can sometimes be strong.
Crafter's Companion has had several new releases. For more ideas, be sure to pop over to the Crafter's Companion Information Blog, as well as visit the Crafter's Companion DT members. You can see their latest designs by clicking on the names on the left side of my blog.
This is one of the most original, utterly awesome tutorials I have ever seen! Seriously GORGEOUS. These are amazing!!! I may have to highjack my kids' domino set now. Wonder if they'll notice...;)
ReplyDeleteTrena, your work is beautiful as always!! I haven't seen dominos for a long time, good to see them again. I love all your pics and steps~great job.
ReplyDeleteVicky Briggs