Friday, August 31, 2012

New Ai Zoo Crew and New DT Members


Two BIG things going on at Art Impressions!!


ThingTwo: New Design Team Members have been announced!

Please stop by the Ai Blog to check out great images, great ideas and inspiration!!


Thanks for visiting!

Take care and STAY POSITIVE!

Trena

Thursday, August 30, 2012

Art Impressions Challenge - Anything Lacey


This week's Art Impressions Blog challenge is   Anything Lacey.  I chose Pearl because of her Lacey bloomers that she's showing. :o) I colored her with my Spectrum Noir markers.


The New Zoo Crew is now available at Art Impressions!!


List of Supplies Used: 
Stamps:  Pearl #K1701, watering can #BB1726
PaperCryogenBasic Grey design paperNeenah Solar White
Ink/ColoringMemento Black ink padSpectrum Noir Markers
Accessories:  Spellbinders Die Cuts


Please pop over to the Art Impressions challenge for this week to see a bunch of inspirational Lacey ideas!  You can enter for a chance to win a coupon!!

Thanks for visiting!

Take care and STAY POSITIVE!

Trena

Tuesday, August 28, 2012

Ready to Go Out!

This week I'm working on one more sneak peek - it's the last sneak because the new Zoo Crew will be available on line at Art Impressions later this week!


I paper pieced her stylish dress and colored her with markers.  I added a little bling to her hat and purse snap. She's ready to go out!

List of Supplies Used:  
Stamps: New Ai Zoo Crew
Paper: Cryogen, Club ScrapStampin' Up!, Hobby Lobby; 
Ink/Coloring: Memento Black ink padSpectrum Noir Markers IG1, IG2, IG4, IG8, IG10
Accessories: Spellbinders Die Cuts, Sakura glitter pens


Thanks for visiting!

Take care and STAY POSITIVE!

Trena

Fairies and Ink

I am having so much fun with Sheena's images!  New fabulous designs are coming out this week!  My card today  features a fairy from her new Hidden Fairy release and stamps from her Silhouette Garden set.


I'm using a coloring technique that I learned at the Create Retreat last week. I stamped the images with StazOn  onto Yupo watercolor paper and then used a paintbrush to add liquid frisquet to the Fairy's wings.


After it dried, I  dropped a color of an alcohol ink in a few spots and blew the drops with a straw. I repeated with a few colors. After I added all the color I wanted, I spritzed alcohol onto the color. I then blew the color around until I was happy with it. I spritzed once more and left it alone, to leave some dots and add texture. I also tried this on semi-glossy but did not get the same effect. The combination of  the Yupo paper and alcohol inks is what makes the nice blending.  I recommend you try this technique with different papers to see what you like best.


After the ink dried, I removed the frisquet with an adhesive remover and the gently pulled it with my fingers.


List of Supplies Used:
Stamps:  Silhouette Garden, Hidden Fairies (coming out this week!)
PaperYupo white watercolorStampin' Up! basic black, Ultra Smooth Premium White Cardstock for Alcohol Markers
Ink/Coloring:   StazOn jet black in padAdirondack Alcohol Inks
Accessories: Pebeo liquid frisquetStickles Star Dust, alcohol in a spray bottle

Thanks for visiting!

Take care and STAY POSITIVE!

Trena

Saturday, August 25, 2012

Create Mixed Media Retreat 2012

Please click on the photo below to see all the fun I had at the Retreat. I highly recommend attending!

Create2012-myartworka

Thanks for visiting!

Take care and STAY POSITIVE!

Trena


Thursday, August 23, 2012

Art Impressions Challenge - One Layer Card


This week's Art Impressions Blog challenge is a One Layer Card.  I chose two of my favorite images for this little scene - the boat and the boardwalk. I just really dig the style of drawing and rocks.  


I stamped the scene first - which was so easy - two stamps! :o) Next I inked up the grass from the boat image and stamped it randomly.  To add color, I started with markers - filling in the boardwalk and boat.


Next, some of the grass blades and rocks.


I used a stylus and ink pads to color the larger areas, leaving white space for highlights and allowing each area to dry before moving to the next. I pulled in color from the outside of the edge in, using a very light horizontal slide. I learned this fun technique from Stampscapes designer Kevin. You can see his tutorials here.  I added the light blue in the caribbean water, and also pulled a little into the green grass.


I stamped the birds outside last, after everything had dried.

List of Supplies Used: 
Stamps: Boardwalk - Front Left #K1481Row Boat - Front Left #J1495, Flying Ducks #I3256
Paper: Glossy white foldover card
ColoringTombow Dual Brush Pens
Ink: Mavy ink pads
Accessories: stylus

Thanks for visiting!

Take care and STAY POSITIVE!

Trena

Tuesday, August 21, 2012

New Paintbox Poppets Snowman


Today I am featuring one of the new Christine Haworth Christmas Poppets! There's something about snowmen that just attract me! I just can't have enough stamps of them. I'm sure you have your favorites too. I admit... I also just have to have several images of trees, pumpkins and penguins. :o)  I'll come clean and share that I have even bought the same stamp twice (more than once) - oh my!! LOL  My sister-in-law, Terry, loves when that happens because she gets my duplicates.

To complete this little scene, I used a combination of coloring with my  Spectrum Noir Markers and paper piecing. I stamped the base image onto Ultra Smooth Premium White Card stock for Alcohol Markers, and stamped the image again on design papers. I've found a different way to cover up my boo-boos when paper piecing. Rather than using a similar color around the the areas where I add pieces, I thicken the black line.  That way, if I cut the piece to small, the black line shows and make it look more 'finished.'


I added shading to the design papers with the lightest shade of my markers. I used a circle punch to cut out a piece of the design paper for the inside.

List of Supplies Used: 
Stamps:  Christine Haworth Christmas Poppets
Paper:  Ultra Smooth Premium White Card stock for Alcohol MarkersDCWV design  paper Holiday Collection
Coloring:Spectrum Noir Markers
InkMemento Black ink pad
Accessories: Tombow Mono Multi Liquid Glue, white gel pen, Stickles Xmas red, Sakura Micron archival ink pen, Sakura glitter pen, Stampin' Up! circle punches

Thanks for visiting!

Take care and STAY POSITIVE!  

Trena

Right On Schedule - A New Ai Zoo Crew Set

Hello Ai Fans! This week I'm working on a card featuring another new Ai Zoo Crew set! I am loving these new images!!  They will be available on line at the end of August.


 I inked up this relaxing feline with a watermark ink pad, stamped it on watercolor paper, sprinkled with emboss powder and heat set. I then scribbled markers onto a pallet and "painted' him and cut him out.


For the background I created an outdoor scene for him. I left die cut around a piece of  X-press cardstock for a thin white boarder. I put a little piece of tape in two corners, on the back of the die cut to keep the paper in place.  I used craft white ink for the clouds. I masked the clouds and airbrushed color on the sky and ground. I stamped random grass, using the Marvy markers for my ink. I used a light grey marker to darken the bottom of the clouds.


On the inside, I stamped the cloud, grass and sentiment. 


List of Supplies Used: 
Stamps - Feline Flop' set #4193, Clouds #E1025, Teeny Tiny Grass #AAA1374, Grass Clump #AA1375
Paper watercolor 140 lb. hot pressed, Stampin' Up!X-press
InkVersaMark watermark ink padStampin' Up! white craft ink pad; Marvy black ink pad

Thanks for visiting!
 
Take care and STAY POSITIVE!

Trena

Thursday, August 16, 2012

Art Impressions Challege - Flowers

This week's challenge is Flowers.  I chose this versatile little vase of roses to highlight in a greeting card.

I inked up the image in gold, stamped it on watercolor paper, sprinkled with emboss powder and heat set. I then scribbled markers onto a pallet and "painted' the flowers and vase.   Such a simple, yet beautiful bouquet!


I added layers of gold and white embossed leaves.  On the inside I stamped the image in gold.


List of Supplies Used: 
Please pop over to the Art Impressions challenge for this week to see a bunch of inspirational Flower ideas!  You can enter for a chance to win a coupon!!

Thanks for visiting!

Take care and STAY POSITIVE!

 Trena

Tuesday, August 14, 2012

Frosty and Bright

Today I'm featuring one of the cute new Christmas Mulberry Wood images coming out this week.  For those of you (I wish I could be one) that start making your Christmas cards now, there's some wonderful, fun images coming out at Crafter's Companion!  Each year, I think I'm going to start earlier, and the months just slip right by. :o)


I used Spectrum Noir Markers to color this little scene.  For the sky, I scribbled IB3 and TB3 onto a piece of plastic and spritzed with alcohol. I used a paintbrush to pick up color and spread. I colored right over the snow because I knew I was going to come back in with a white paint pen. I also used the paint pen on the moon, then drew over the outline with a black waterproof pen to make it pop. 

I stamped a small area of the image a second time and cut out his scarf. I used pop dots to adhere it.  To give some dimension and "frost" to the scene, I used Liquid Applique and glitter.

List of Supplies Used: 
Stamps: Mulberry Wood
PaperUltra Smooth Premium White Cardstock for Alcohol Markers, Stampin' Up!
Coloring: Spectrum Noir Markers, Sakura red glitter pen, Sharpie white Poster Paint Pen
Ink: Sakura Micron archival ink pen,  Memento Black ink pad
Accessories: alcohol, paintbrush,  Cuttlebug folder, Liquid Applique, fine glitter   
Thanks for visiting!

Take care and STAY POSITIVE!

Trena

It's ok....One More Sneak Peek

Hello Ai Fans! This week I'm working on another sneak peek. This cute elephant set is from the Art Impressions summer CHA release and is part of the AI Zoo Crew.

 I stamped the elephant image on Cryogen cardstock and on the design cardstock.  From the design cardstock, I cut out her dress, hat and purse.  I used markers to color her body, glasses and flower.  I also colored around the edge of her dress and accessories with a color that matched the design cardstock.

I cut out the main image with a die cut, glued all the pieces on and added a little bling to the flower with a glitter pen.  TIP: for paper piecing, use a liquid glue which allows more time to get the pieces in place.  On the inside, I adhered the sentiment layered on the same black cardstock (Club Scrap) as the outside -  if you look closely, you can see the texture.  I also added a little flower punched out of the design cardstock.

This set is available at a store near you, on the Art Impressions website August 30!

List of Supplies Used:  Paper - Cryogen, Recollections, Club Scrap; Coloring -  Spectrum Noir Markers; Ink - Memento Black ink pad; Accessories: Spellbinders Die Cuts, Sakura glitter pen, Tombow Mono Multi Liquid Glue, Stampin' Up! flower punch

Thanks for visiting!
 
Take care and STAY POSITIVE!

Monday, August 13, 2012

Art Impressions is having a DT Call

If you are interested in being on the Art Impressions Design Team, there's a call going on right now! Pop on over to see the requirements and enter! It's a wonderful team to be a part of!

Take care and STAY POSITIVE!
Trena

Saturday, August 11, 2012

Winner Birthday Blog Hop!

  The Birthday blog hop winner of the Party Time set
 Popcorn the Bear EZMount Stamp Set - Party Time
for my blog is:
Liz

UnikeByYes said...
Fabulous card Trenna!!! Love e images so sweet! TFS and for all you do and share with us!
Have a lovely day!
Liz


Liz please send your mailing address to me at: tlynn@wideopenwest.com.
Thank you everyone for your nice and sweet comments!!
Take care and STAY POSITIVE!
Trena

Thursday, August 9, 2012

Art Impressions Challenge - Any Sentiment

This week's challenge is Any Sentiment.


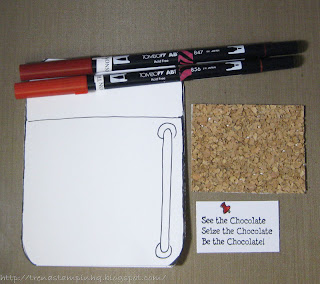
I chose one of my favorites subjects, chocolate! :o)  I drew a refrigerator on the front of the folded card using a multiliner pen. Next, I cut around the shape. I drew lines on the inside for the shelves.  TIP:  google clip art of the object you want to draw. Draw in pencil first, then draw over lines with pen. Erase all pencil lines.

I stamped the see the chocolate sentiment onto a piece of white cardstock and cut it to size. I drew a push pen on it and colored it.  I cut out the "cork board" to fit on my frig door and adhered a piece of cardstock for sturdiness.


For the handle, I colored directly onto the cardstock. To give some shape to the refrigerator, I scribbled marker onto a watercolor palette and picked up color with a N00 blender pen and colored lightly. I stamped veggies  and fruit inside on the top shelf, using gray Tombows. On a scrap piece of cardstock, I stamped Jacque with a black ink pad just for his cake again. :o)  I scribbled onto a palette and picked up color with the N00 blender to color the cake.  I cut out the cake and adhered it inside the frig. To see another project I did using Jacque just for his pastries, click here


List of Supplies Used: 
Stamps: Chocolate #G4046  Jacque #Q2836, Carrots #E3294, Lettuce #D3296, Corn #K2097, Apples #AA3290
Paper:  Club Scrap, Neenah Solar White
Coloring: Tombow Dual Brush Pens
Ink: Sakura Micron archival ink pen, Marvy black ink pad
Accessories: Stamp-a-ma-jig, Watercolor Palette #WCPLT

Please pop over to the Art Impressions challenge for this week to see a bunch of inspirational Any Sentiment ideas!  You can enter for a chance to win a coupon!!

Thanks for visiting!

Take care and STAY POSITIVE!

Trena

Tuesday, August 7, 2012

Soaring

For my Ai Project this week I'm working on an outdoor scene.


I started with the background, layering color. I used a stylus and a light touch to pull color from the edge of Cryogen cardstock in. I started with the lightest blue - I squirted a few drops of ink into the lid, picked up color and pulled from the edge in going all the way to the center. I then added the next darkest blue, picking up color from the ink pad going not as far into the center, and so on - until the final layer of dark blue close to the edge.


I used a die cut to make a template for the clouds. I picked up the lightest blue with the stylus made small circles over the edge of the template creating subtle clouds.

For the forest image, I used a combination of blue and black inks, and stamping off on some of them to make the trees look like they were off in the distance. The eagle is stamped with VersaFine.

List of Supplies Used:
Stamps Soaring Eagle #F3262Sm. Forest #E692
Paper - Cryogen, glossy white
Coloring/Ink - Memento Ink Pads summer sky, bahama blue, danube blue, paris dusk, tuxedo black, VersaFine onyx black ink pad
Accessories - stylus, Spellbinders die cut

Thanks for visiting!
 
Take care and STAY POSITIVE! 

Trena

Provence in Watercolor

Hello!  Today I'm sharing a water color scene.  I love Sheena's  A Little Bit Scenic series!  For this card, I'm using the Provence set.


I inked up the image with VersaFine, stamped onto cold press watercolor paper sprinkled with detail emboss powder, and heat set.


Next, I trimmed down the paper and started coloring! My choice of medium today - Tombow Dual Brush Pens.  I worked in one small area at a time using  a combination of direct and in-direct methods to fill in color.  For the direct method, I colored directly onto the paper with the markers and then spread the color with a water brush, starting in the lightest area - and always starting with a clean brush.  In very small areas, I colored just a small amount and left part of the area without color - that would be the "lightest" color that I started in. For the in-direct method, I scribbled the marker onto a non-stick surface and picked up color with a water brush.  As with traditional water coloring, I wet the area first.  TIP: if you want more contrast, you can add a darker color after an area drys - this works with both methods.


On the inside I added a piece of design paper. I colored a portion of the stamp with a Memento marker and filled in color with the Tombows and a blender pen.

List of Supplies Used:
Stamps:  Sheena Douglass Provence set
Paper: Canson 140 lb cold press watercolor, BasicGrey, Stampin' UP! basic black, Georgia Pacific white
Coloring:  Tombow Dual Brush Pens
Ink:  VersaFine onyx black ink pad,  Memento tuxedo black marker
Accessories:  waterbrush, Stampin' Up! black detail emboss powder

Be sure to participate in our Crafter's Companion Blog Hop this week by visiting each of the DT members and leaving comments on our blogs - Monday's Post!  You can start at Carolyn's!
 Take care and STAY POSITIVE!
Trena