Thursday, January 31, 2013

Art Impressions Challenge - "Piece it Together"-Paper Piecing

Do you have special friends like this?  


The kind of friends that you hang out with and have the best stories. :o)  My design today features a fun Party Group (Sku#U1552) and the sentiment Always be Friends (Sku#G3566). 

This week's Art Impressions Blog challenge is  "Piece it Together" - Paper Piecing. I used a combination of inks, markers and paper piecing with design papers to make this card.  This size of the card is 4" x 6".

I inked up the party people image with black distress ink pad and stamped on glossy card stock. Allowed to dry. Decided which parts of the image I wanted to use the design papers on. To color, I used a small paint brush with various ink pads. I also dipped my brush in water to help spread color. I was not sure if it would work on the glossy card stock, but it did! To add color in small places, or to fill in for ink pads I did not have, I used markers.


I also added some detail with a micro pen. To provide grounding for the party group, I used a stipple brush and gray ink pad. I stamped the sentiment last with VersaFine, using a stamp positioner for placement.


Please pop over to the Art Impressions challenge for this week to see a bunch of inspirational Paper Piecing ideas!  You can enter for a chance to win a coupon!

Thanks for visiting!

Take care and Stay Positive!

Wednesday, January 30, 2013

Tina in Pink

I had so much fun with Tina yesterday, I had to design another card featuring her - this time in pink. :o)  The design paper is from DCWV.


Thanks for visiting!

Take care and STAY POSITIVE!

Tuesday, January 29, 2013

Tina

I'm designing on more Valentine's Day cards! :o)


This card features the Tina Set (Sku#4215).   Isn't she great?! I dig her expression - it says 'joy' to me.  This is a quick, fun card that has a lot of personality.  I stamped her onto Cryogen cardstock and colored her with markers. 


I added some bling to her shoes,  lips and earrings with glitter pens.  I outlined her balloon with a black mulitliner to really make it pop. This is also a good way to hide any coloring over the line. :o)


On the inside, I added the sentiment from the set and a strip of design paper.  


Thanks for visiting!

Take care and STAY POSITIVE!


Friday, January 25, 2013

Batik Technique with Spectrum Noir Ink Refills


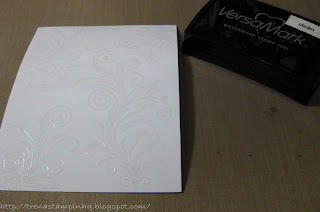
I made two lovely backgrounds with this technique.  I first saw this technique demonstrated by Tim Holtz on the Carol Duval Show. Remember Carol?!  I miss her! I stamped swirl images randomly with a watermark ink pad onto glossy card stock, sprinkled with emboss powder and heat set.


I used one drop of each color (HB2, TB1, DG2) of refill inks onto felt, spritzed felt with alcohol, and tapped  it onto background. Repeated apping until I got a combination of colors I was happy with.


Next, I laid the glossy design on top of a piece of Ultra Smooth Premium White Cardstock for Alcohol Markers and used my craft iron to apply heat.  The heat transfers the color of the embossed image from the glossy to the mat card stock, creating a negative image. Really cool technique!


Background on glossy (left): Stamped butterfly image from the Sheena's A Little Bit Scenic - Flying Colors set directly onto glossy background with StazOn. Stamped same image a second time onto vellum.   I cut out the vellum image, pressed into a glue pad, added glitter. Added a couple drops of Stickles on the butterflies body.

Background on mat (right): Stamped small butterfly image from set three times onto vellum.  On the opposite side dropped a few of the same colors I used on background. After it dried, I used a liquid glue to adhere the vellum piece. I put small dots of adhesive on the areas of the images so it would not show through.


NOTE: Make sure you are working in a well ventilated area. The smell of alcohol can be strong at times.


Thanks for visiting!

Take care and STAY POSITIVE!